Become a Patron!


 |
| by Fantasy Flight Games |
"Army or Not, You Must Realize, You Are Doomed..."
A long time ago, in a galaxy far, far away...
I, Mike Meeple, got Star Wars: Legion.
I kind of resisted doing tutorials for this game, keeping it as kind of a game that was just for me and playing, but my readers have spoken. They want to see me do some low key simple paint jobs on these Rebel Scum and Space Nazis, so today we're starting with my legit favorite character from the prequels: General Grievous.

Now, I'm not talking about the General Grievous that showed up and was instantly chumpatized by Obi-Wan, I'm talking about the silent warrior who terrorized the Jedi in Genndy Tartakovsky's brilliant animated series.
You know what's badass?
A four armed cyborg assassin who can take out a half dozen Jedi at once.
You know what's lame?
A four armed cyborg with asthma.
Anyway, let's get to it.
1. Gameplan, Prep, and Prime
So, the coolest part about what comes in the Star Wars: Legion Clone Wars Starter Set is the fact that Fantasy Flight has really tried to give us more options regarding customizing your army's look.
Grievous himself comes with options for a cape and various numbers of arms and weaponry, but I'll be taking my inspiration from the start of his awesome fight with Obi-Wan from Episode III.

Yeah, he's pretty badass in this scene.
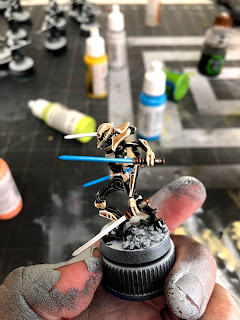
Mine had some issues with getting his feet to be flat on the figure base, so I glued some coarse ballast underneath him to fill the gap.
To help me recreate this look, I've assembled the following paints:

Vallejo
Army Painter
Citadel
You may see some Salmon Rose above, but I ended up not using it, while I forgot to take a picture of the Silver.

I started off with what I call my "Poor Man's Zenithal" highlighting, where I spray on a black undercoat with some Matt Black Spray On Primer by The Army Painter and then hit it with a blast of Matt White primer from directly above. This helps darken in all of the small nooks and crannies that are typically hard to paint, while still providing us with a white undercoat to help make the colors pop.
2. Basecoats
Remember, always thin your paints with equal parts water unless I say otherwise.

We're actually going to start off with our gunmetal grey, unthinned, and paint all of the "Skeleton" of the model. The only portions that actually the ivory color are his outer plates, so anything that looks like it would be housed under that shell, you would paint.
If you ever get confused, there are plenty of reference photos online.

Now, take your ivory, thinned with equal parts water, and paint the armor portions. There's armor on the chest, hands and fingers, portions on the biceps and forearms, shoulders, the mask and collar obviously, but also the knees and shins.
Again, if you get confused, don't be afraid to look at some reference photos.

Here's an idea of the armor portions on the back of the model.

After that, take your rose brown and paint the eye sockets. If the shape gets a little away from you, don't be afraid to repaint the mask with the ivory.

Next we'll be painting the lightsaber hilts with plate mail metal. Again, if you get some of the plate mail metal on Grievious's hands, don't be afraid to repaint those portions of armor.

Lastly, you can use to copper and german grey to add some variety and detail to the lightsaber hilts, and feel free to be as creative as you want in order to give the model some flair.
Once that's all dry, it's time for shades!
3. Shading
So, we're keeping it pretty simple today:


Start off with the soft tone, and apply that to every portion of the model that is not his "Skeleton" or his lightsabers. This includes his eye sockets.

Once that's dry, apply nuln oil to the "Skeleton" and the lightsaber hilts. Don't bother with applying wash on the lightsaber blades, as we're just going to be painting over them.
If you get a little nuln oil on some of the armor, don't worry too much about it, as it'll just add a level of age and distressing to it.
4. Highlights and Finishing Touches

We're going to start with highlighting the armor using ivory once again along with your smallest brush, so we can have the most control over some of the fine detailing we're about to do. Here, you can see that I've highlighted the center portion of the mask, along with painting the cheekbones underneath the eye sockets.
I've also started to give the armor an edge highlight by painting every edge. Above, I've painted the chest armor and the armor on his hips and pelvis.

You'll continue with those edge highlights throughout the entire model, anywhere there's the armor. Just think of it like outlining the armor.

Here's another angle where you can get a good idea of where to place the edge highlights.

After that, take some daemonic yellow and paint the eyeballs. Nothing too fancy, just try to follow the shape of the eyes.
You'll also want to take this time to paint the blades of the lightsabers completely white. This helps provide us with a strong white undercoat so that the blades themselves can be as bright as possible.

Take your andrea blue and paint the two lightsabers in his bottom right and top left hands. Nothing too fancy, just get a nice even coat.

Now, we're going to mix some paints. Take your silver and mix it together in a one to one ratio with your andrea blue. Take this mix, and paint a line along the lightsaber on one side, almost to the tip of the lightsaber, like the dark mustard colored line in the picture above.
Next, add in another drop of silver, and paint another line, covering up most of the silvery blue line you just painted, but not all of it, like the lighter mustard color above.
Continue this process of adding an additional drop of silver, and painting a smaller and smaller portion of the lightsaber, following the above template, until you have a nice gradient of glistening blue lightsaber.

And you should end up with something that looks like this.

Next, you'll mix together your moot green and yellow green, in a one to one mix, and paint the other two lightsaber blades. When that first coat is dry, you'll now perform the same process of adding silver to the mix and painting smaller portions of the lightsaber, just like you did with the blue lightsabers until you end up with a result like this:

You can see this provides us with a pretty decent glow effect that looks very natural.
5. Spin Those Lightsabers!

That's it, Padawans! Spray that guy with some matt spray and base him however you like before you get him to lead those Separatist forces!
Hopefully you enjoyed this first foray into Star Wars: Legion content, and you can always find this and my other tutorials for Star Wars: Legion here on my blog for future reference. And if you found this particular helpful, I humbly ask you to consider becoming a Patron. It's only $1 a month, and every bit of it goes to helping me provide you, my readers, with quality content.
Comments
Post a Comment