Become a Patron!
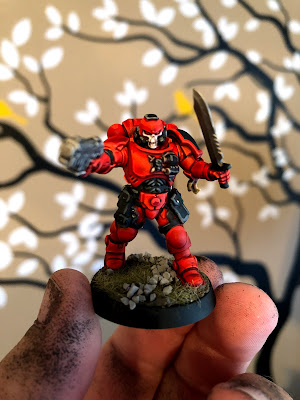

Okay, so here are my bases. Three Primaris Space Marines who I'll be painting up to be part of my Blood Angels Kill Team (review coming soon).
The three methods I'll be comparing will be:
1. Contrast Paint Method
2. Traditional Basecoats, Shades, Highlights Method
3. Color Primer, Shades, and Highlights
It should be noted that for the two marines I've primed white, I'm using Citadel Skull White spray on primer, and for the color primer, I'm using some super cheap Rustoleum stuff. I know, I know, I always say spend the money on good primer, but quite a few people online have been saying that Rustoleum will do the trick, so...


Painting Not-So-Poorly
Okay, so I’ve been doing Painting Poorly tutorials for over a year now. My focus has been and remains the same: minimum effort and cost for maximum results. That’s not always the case, however, as there tends to be a trade off of sorts. The less money you spend, the more effort you have to invest for quality results. And I’m usually okay with that.
A few months ago, however, Citadel announced that they were releasing a line of paints that would virtually eliminate some of the steps for getting a tabletop ready miniature, specifically, a paint system that would combine the basecoats, shading, and highlight steps in one.
Of course, we're talking about their new Contrast Colour Line.

Well, I was skeptical to say the least... Even MORE skeptical once I saw some of the results posted by people online.
So, instead of simply buying a set and doing some painting and telling you my opinion, I figured I'd take a look at three methods used for painting to a tabletop standard and comparing the three.

The Methods of My Madness

Okay, so here are my bases. Three Primaris Space Marines who I'll be painting up to be part of my Blood Angels Kill Team (review coming soon).
The three methods I'll be comparing will be:
1. Contrast Paint Method
2. Traditional Basecoats, Shades, Highlights Method
3. Color Primer, Shades, and Highlights
It should be noted that for the two marines I've primed white, I'm using Citadel Skull White spray on primer, and for the color primer, I'm using some super cheap Rustoleum stuff. I know, I know, I always say spend the money on good primer, but quite a few people online have been saying that Rustoleum will do the trick, so...
1. Contrast Paint Method

I'm using the Blood Angel Red contrast paint, and I have to say, it looks pretty good. This is a single coat, undiluted, applied straight from bottle to miniature. As you can see, it's a pretty even coverage, and it definitely does a good job of applying shadows to the recessed areas, just like a traditional basecoat and wash method would, but in much less time. Outside of drying time, it took about three minutes to get this result.
One complaint would be that it doesn't actually have the strong highlights that I would like, and at this point, I'm already looking at adding highlights to portions to help make them pop.
2. Traditional Method

So, for this method, I used the traditional method of basecoats (Vallejo Red) and a wash (Army Painter Red Tone). The results of having a shaded miniature is virtually identical to the contrast method, complete with the desire to further highlight the mini to make it pop.
I will say, however, that this method did take much longer. I had to thin my paint, basecoat my guy, go over some areas where coverage was uneven, wait for it to dry, then apply my red wash. All in all, this took me about 10 minutes to get to this point.
3. Rustoleum Color Primer

Great God almighty, what have I done? This Rustoleum, $3 a can, red primer is just absolute junk. It went on absurdly thick, and is completely gunking up the details of the mini. I've applied red tone to the model, which took approximately a minute or two.
The wash does a good job of a good job of darkening the details (what few are left), but I'm going to be focusing mostly from here on out on figuring out what I can do to save this mini from looking like the Space Marine version of Sloth from the Goonies...

Highlights and Finishing Touches
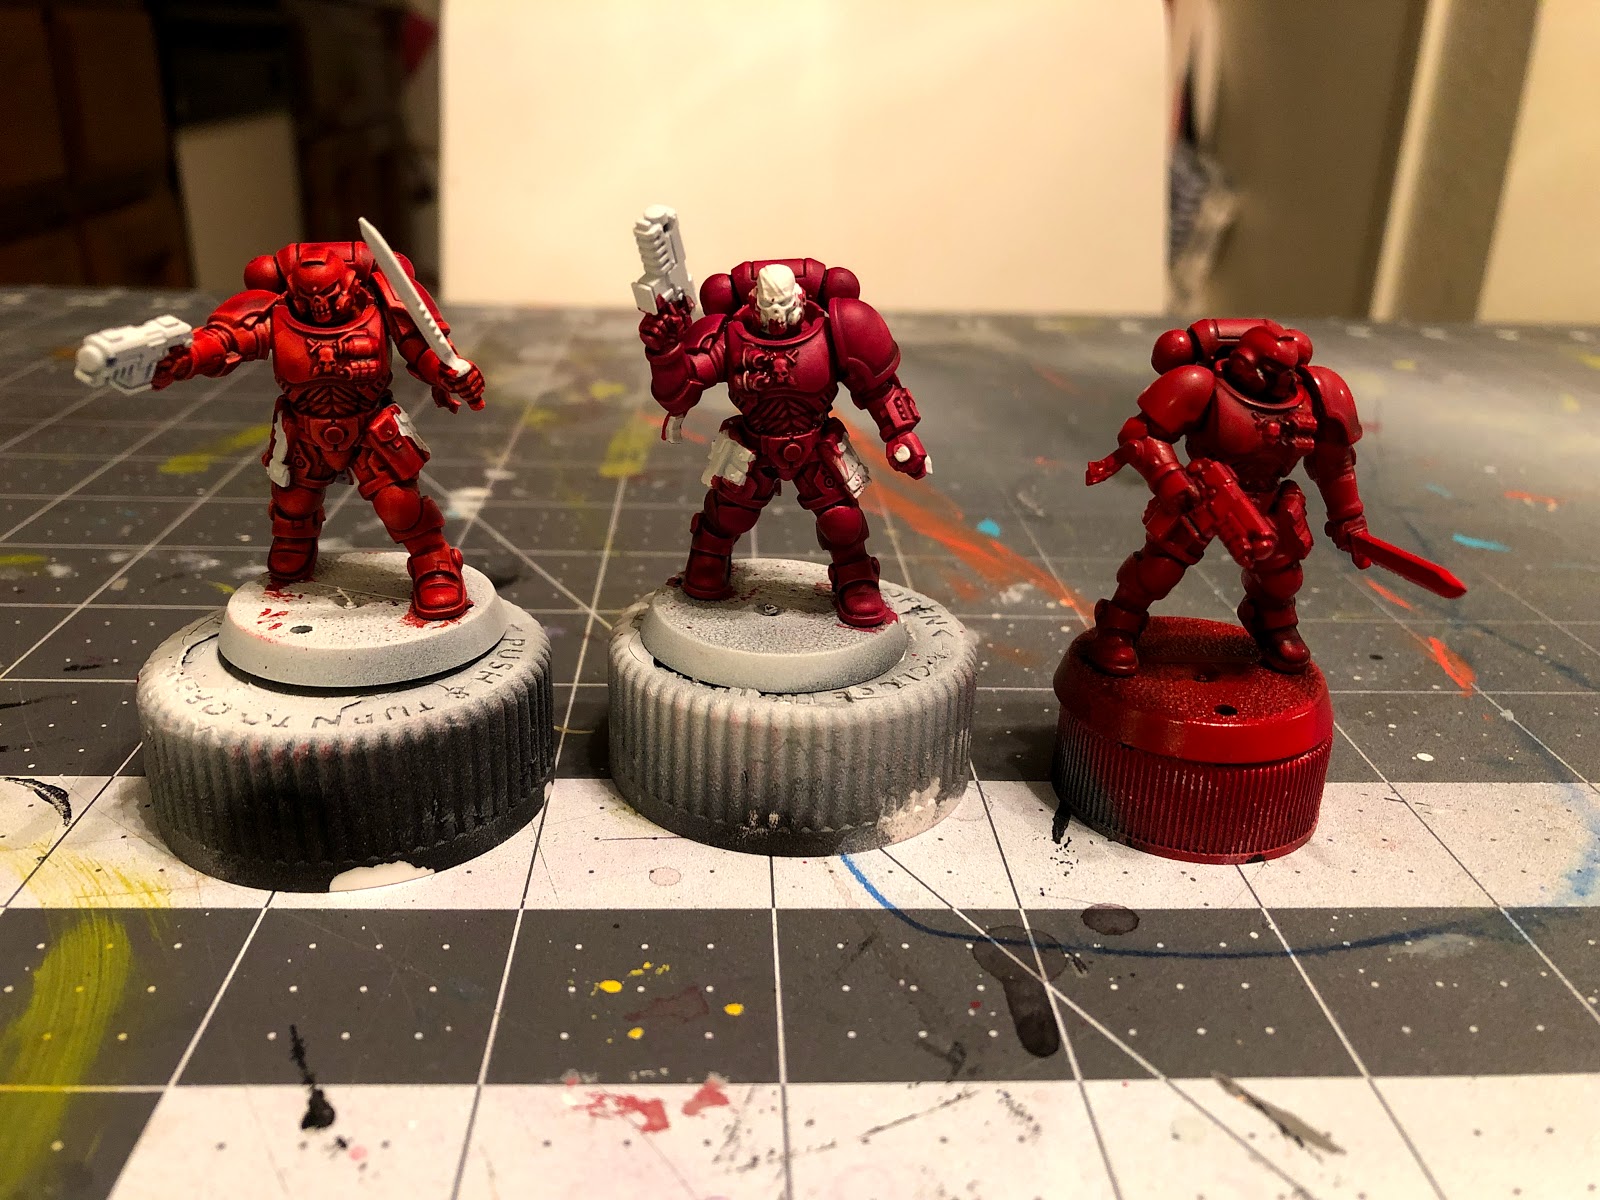
At this point, comparatively, you can see they all look pretty similar. From here, I'll be adding highlights (to all three, actually) along with painting the weapons and black portions of the models and the white skull masks.

For the most part, the non-red portions of the model painted up pretty well, but I will say, the Contrast paint itself is a little on the thicker side, so if you're painting over a section you've already contrast painted over, some of the detail can get a little lost. Nothing like the Rustoleum, but the detail of the pouches on his thighs, and the ridges on his abdomen definitely came out better with the traditional method.
Overall, however, each mini took about another 15 to 20 minutes to paint up and get to a full tabletop standard.
Conclusions

So, here are the three models in the same order as when we started:

1. Contrast Method

2. Traditional

3. Rustoleum Color Spray (I can't BELIEVE I saved this model!)
Shockingly, there's not that much of a discernible difference between them, even the $#*%@ Rustoleum!
But did the Contrast paints follow through on their promise of being a one step solution to painting? Well, not really. I still needed to highlight and do detail work, so I can't really say this is any easier than simply getting a PROPER color primer spray (DO NOT USE RUSTOLEUM).
That means that if they all come out about the same, what's the big difference?
Well, once again, it comes down to money and time. The color spray and contrast paint were one hundred percent faster than the traditional method, but I don't know that I'd want to use the contrast paints on something that's highly detailed.
You see, the very nature of contrast paints lead them to be unable to cover up your mistakes. If you paint some black on an area that's supposed to be red, you can't just cover it up with contrast paint, the darker color is still going to show through, so in that respect, it may not be the smartest move to move forward with the mentality to use ONLY Contrast paints.
Let me be frank here, they are very handy, as as I work on the rest of my Blood Angels, I am definitely going to be using them.
But for something like this, with big blocks of the same color, like Space Marines or even Night's Watch units, Contrast paints are definitely something that I'd like to have in my toolbox, just maybe not a toolbox with ONLY Contrast paints.
Comments
Post a Comment