Become a Patron!


 |
| by CMON Games |
"Wildfire is But One of the Dread Secrets of Our Ancient Order..."
Welcome back, Westerosi! So, today on Painting Poorly, we are going to be taking a look at how to paint one of the units that I have been waiting for ever since it was announced this past April... The Pyromancers.

These guys are steeped in Lannister crimson and gold, which shouldn't be too much of a problem as we've gotten plenty of practice with that color scheme between Tyrion and the Guardsmen, however, they've got one thing that elevates them from just another unit, to one of the most difficult and advanced things we've ever painted. So, now that I've scared the bejeezus out of you, let's get to it!
1. Gameplan, Prep, and Prime
Okay, so, you guys know that I always try to base my paint schemes off of the character's appearance in the HBO series, however, I can't do it this time. I know that Hallyne showed up in the show, and he's a Pyromancer, but I'm sorry. He does not look as cool as the in-game art. I mean, just look at this:

I mean, MAN. That art just looks SO BADASS! So, I'm going to be duplicating that to the best of my ability. As such, I've assembled the following paints:

By Vallejo we have Gold, Flat Earth, Chocolate Brown, and Basic Skin Tone, though any generics of those basic colors will work just fine. I got most of the paint for this mini at Target and the craft store, where I purchased the dark red which I've been using for all the Lannisters, black and white for our 50/50 mix, and a bright, almost neon green, and a lighter yellowish green.

Like always, I've primed my minis with matt white spray primer by The Army Painter. Once that's dry, we're ready for our basecoats!
2. Basecoats
Quick reminder: Unless otherwise noted, always thin your basecoat paint 50/50 with water.

Alright, so we're going to be starting off with the dark red. Paint the sleeves, the skirt, the vest, and the collar. You can be pretty liberal with you application, but try to avoid the face or skin, as red is difficult to cover with flesh tone.
You may have to do two coats in order to achieve the consistency in color that you're looking for. How will you know if you should do another coat? If you're wondering whether you should or not, the answer is yes, you should. Just make sure the first coat is COMPLETELY dry before applying a second.

Next, you'll paint the face (and in Friar Tuck and Jean-Luc Picard's case, the tops of their heads) and the hands with the basic skin tone. Nothing too special here, just try to get consistent coverage for both.

After that, you'll take your chocolate brown and paint the pants. This can be a little tricky where the pants meet the red cloak/skirt, but just try to be careful.
You should also take this time to paint the belt as well.

Now, mix up some of your 50/50 black/white mix and paint the cuffs and the boots, making sure to avoid the flame details on the cuffs and the gold trim at the top of, and running down the middle of, the boots.
I also left the toes of the boots unpainted (at this point) as well, as it looked like they are wearing little elf shoes, where the toes curl up to a point, but if you just want to paint them now, you're more than welcome to.

Then, it's time to paint the hair. Use your flat earth to paint Friar Tuck's hair ring and the guy with normal hair's hair, while you should use some white to cover up any boo boos on Jean-Luc Picard's beard:

Once this is done, it's time to paint the wildfire.

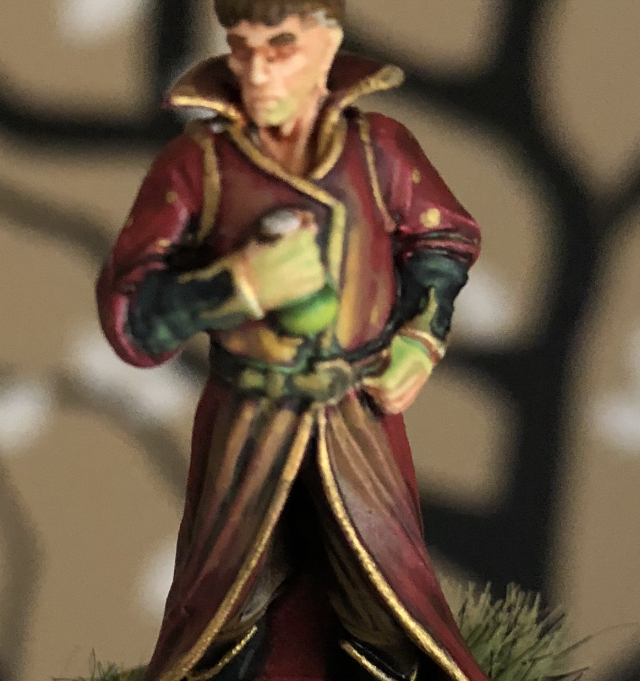
So, for these tiny bottles of death, you'll use your bright green. Just color the round basin portion of the bottle and leave the neck of the bottle white. For the model pictured above, make sure you get the small hole between his thumb and forefinger on his right hand.

Time to go for the gold! Using your UNTHINNED gold paint, you'll paint all the trim around the vest, the boots, the skirt, the belt buckle, and the flame design on the cuffs.
You'll also paint the buttons/snaps that line the front of some of the models.

There is a gold trim that runs along the top of the collar, so you can simple take the side of your brush and run it along the collar to create color up that gold trim.

The very last thing you'll do for the basecoat is take your gold and make some dots on the sleeves. Just place them as randomly as you can, but try to avoid putting them DIRECTLY on the folds of the sleeve that are on the front. This comes into play later...
Once that's all dry, we're ready for some shading!
3. Shading
Okay, so we actually have it pretty easy with the Pyromancers in regards to what washes we're going to use. Only two:

Flesh Wash and Dark Tone, both by The Army Painter. The order in which you apply these washes doesn't really matter, though I chose to start with the Flesh Wash.

Apply the flesh wash to all of the skin. So, their faces, hands, and for some of the more bald sculpts, the tops and backs of their heads as well.
Try not to get any on the bottles of wildfire that they're carrying, as you don't want to change the color from that bright green.

Now use the dark tone on all of the rest. This includes the clothes, the hair (even the white hair) and, yes, also the bottles of wildfire.
This layer should be relatively thin, so don't use too much, just enough to darken the red a little, but not make it look blackened.
Once that's all dry, it's time for highlights!
4. Highlights

So, the first thing we'll be highlighting will be the skin, like we typically do. Taking your basic skin tone, you'll paint the forehead, nose, cheekbones, and top of head of Pyromancers. This is also when you'll highlight the hands and fingers, as well.
Use your detail brush and try to get a good line of highlight on each individual finger and each tendon as they stick out from the back of the hand.

Now we move onto highlighting the pants with our flat earth. Just paint front and folds of the pants from the knee up. That will give them a great highlight and not take too long.
You can also highlight the belt at this time by painting just a thin line at the top of the belt, all around the Pyromancer.

You'll also want to apply some basic top-down highlights to the guy with hair, and for Friar Tuck:

Just paint a little line of flat earth around his hair ring (?).

For Jean-Luc Picard, you'll want to use your white and your detail brush to bring his beard back up to the proper color. Don't forget that his mustache actually curls at both ends, like an old timey villain, so make sure you highlight the curls as well.
Don't forget to paint their eyebrows on at this stage as well.

Now, take that white, and mix in a LITTLE black, so that it's just a hair lighter than your original 50/50 black/white mix and apply some basic top down highlights for the cuffs.

After that, it's onto the red. Using your dark red again, you'll begin to highlight the folds in the clothes. You'll also want to apply some top down highlights to the shoulders and the top of their backs, where their shoulder blades would be.

On their front, you'll apply the dark red to the folds in their skirts, and the folds in their sleeves near their elbows (which is why I said not to put any gold dots there earlier).

The very last thing we're going to be highlighting will be the wildfire itself. Remember that yellowish green that I mentioned in the beginning? Well, we're going to put just a small highlight in the center of the basin portion of each bottle.
Make sure you keep it in the center as that helps keep the bottle looking round.
Now, that's the last highlight that you'll be adding, but that doesn't necessarily mean it's the last step for the Pyromancers!
5. Object Source Lighting
Okay, I'm going to start off by saying that this step is COMPLETELY optional. Object Source Lighting (or OSL) is a pretty advanced technique, and I am going to be showing you some of the most basic methods for applying it, but, if you like your Pyromancers the way they are at this stage (which should look pretty good) then you can totally call it a day.
Still with me?
Awesome.
Okay, so the idea behind OSL is that their is an object on the miniature that is emitting some kind of glow that can be seen on the mini. In this case, it's the bottles of wildfire. I'm going to be using two different techniques to simulate that glow. You'll need the paints we've already been working with and some GLAZE MEDIUM. You can use water if you like, instead of glaze medium, but it's a little tougher to control where it goes.
So, we're going to start off by creating a glaze. For my mix, I used 5 drops of glaze medium and this much of the bright green paint:

As you can see, it's not that much at all, just about half of a brush load. When you mix it all together, it should look something like this:

You can add more green for a more vibrant and greener effect, but go slowly, adding a little at a time. The glaze should be transparent, almost like a wash, but instead of running into the crevices of the mini, it should go on evenly.

We're going to apply this glaze to where the glow from the wildfire would be hitting the skin and belt. So, the front of the left hand, the thumb and index finger on the right hand, but not the rest of the fingers on the right hand, since they're covering the bottle, so the glow wouldn't hit them. Make sense, kind of?
Also add some glaze to the right side of his face, and JUST the right side. This will help show that the color is coming from a single direction.
Once this layer is dry (and if you're using glaze medium, it can take a LONG TIME) we're going to go over these same areas with the glaze again, to intensify the color, and we're going to do this over and over again, with the most intense color being the areas closest to the wildfire bottle.
For example, in the picture above, the side of his face might only get one coat of glaze, while his beard gets two, and his hands get four or five.
You can also apply this glaze technique to the cuffs, the gold trim, and belts where appropriate.

For the red clothing, instead of using the glaze, we're actually going to be doing multi level highlights, but we'll be using the yellowish green as to lighten our base color.
So, starting with a 2/1 mix of dark red/yellowish green, you'd paint the highlights as marked in blue below:

Instead of doing highlights like we normally would (with the light source being the SKY) we're doing highlights that emanate from the wildfire, so the brightest highlights will be closest to the bottles.
After that, add in an additional portion of green, and layer on this highlight, marked in green:

Then, add in another portion of green, and layer on an additional highlight, which I've marked in yellow:

You can keep doing this, adding more green and painting smaller highlights closer and closer to the bottle, along with glazing, until you get the level of glow intensity that you like, and it will look something like this:
6. Respect Wildfire's Power!

That's it, guys! Base these guys however you want to, spray them with your matt spray, and go play with fire!
As always, this tutorial, along with all the rest in my series on the A Song of Ice & Fire Miniatures Game can be found on my blog here, and if this tutorial has helped you at all, I ask you to consider becoming a Patron. It's only $1 a month, and every dollar helps keep this blog AD-FREE and helps me to deliver quality content on a weekly basis.
I really need to try more subtle OSL.
ReplyDeleteCheers for the guide man!
Wow. These look great
ReplyDeleteNice work. I'm getting a unit for my army.
ReplyDelete