Become a Patron!


Starting with you soft tone, apply a thin layer to the tunic. Just enough to accentuate the folds in the fabric, and do your best to avoid getting any on the skin, especially around the chest. If you do, simply dry off your brush, and use it to soak up any excess before it dries.

After that, take your dark tone and apply it to the pitchfork and handle, the hair and headband, the belt and buckle, the green satchel, and boots and pants. Again, only a thin layer to deepen the folds and add depth. Don't let it pool up too much around any given location and DEFINITELY try not to get any on the face.

Next, use your strong tone on the sack over his shoulder and his wristbands. You should really see how the wash accentuates and deepens the stitching detail in the sack.

The last thing you'll be washing will be the skin with your flesh wash. Just use a thin coat, and try not to let it pool up too much in any one particular area.
Now, let that dry for about an hour or so (less if you turn on the ceiling fan), and when it's COMPLETELY dry, we can move onto highlights!


That's it, guys! Congratulations, you've just finished your first mini (or 12!). Keep checking back here on a regular basis, as we'll be moving through all of the figures in the base game (and hopefully more!). This, along with all of my Heroes of Land, Air & Sea tutorials will be available on my blog as well for reference!
If you liked this, or found it helpful, please consider becoming a Patron! Every dollar helps bring you quality ad-free content like this tutorial!
Until next time!
 |
| by Gamelyn Games |
Serf's Up!
Hi, everyone! Today we're starting the newest in my Painting Poorly series. We're starting to paint the miniatures from the Not-So-Tiny EPIC game Heroes of Land, Air & Sea by Gamelyn Games! Gamelyn Games was AWESOME enough to send me a copy of their 4X strategy wargame so that I could create this blog to help YOU the players paint up your copies!
For those of you who haven't read my blog before, the Painting Poorly series is designed for the beginner painter. If you've been painting miniatures for the past 10 years, you are probably a better painter than I am, and this blog is not for you...
HOWEVER, if you've been wanting to start painting miniatures, specifically with this game, but you've been too intimidated by the idea of spending HOURS upon HOURS layering 17 different shades of yellow, well, brothers and sisters, you might just have found the right place.
My methods may not ever win you any painting competitions, but they're quick, they're easy, and they're going to leave your game looking cooler than just a bunch of plastic, and at the end of the day, isn't that the point?
If you're BRAND NEW, I suggest taking a look at some of my General Tips section of my Painting Poorly section, especially Volume 1 - The Basics and Volume 2 - Finishing Touches. These will give you a general idea of my method, and let you pick up some of the terminology I'll be using. Once you're ready, though, come back and we can start with the Human Serf.

I chose this guy to start off because, well, there are 12 of him, so if you mess up on one, you've got 11 more tries to get it right. It's a lot less painful to learn your techniques when you have a dozen spares lying around, compared to messing up your one unique Mage miniature.
1. Gameplan, Prep, and Prime
Okay, so my gameplan for all of my miniatures painting is based on the in-game art. In this case, the small picture found on the Human Player Board:

There's actually a LOT of different colors going on in this picture, and here are the colors I've chosen:

Army Painter
Plate Mail Metal
Vallejo
Orange Brown, Dark Sand, Chocolate Brown, Flat Earth, Basic Skin Tone
Ceramcoat
Medium Foliage Green
Handmade Modern
Dark Lapis
All of the Vallejo colors can be found in their Leather and Wood pack, which is about $25 on Amazon for a pack of 8 paints, except for the basic skin tone, which is found in their Face/Skin pack, which is even cheaper. You can substitute craft paints, which are much cheaper, but they have a hard time going on as smoothly, so you may have to do multiple coats, which is fine, but you have to have patience for it.
From Michael's I got the green, and Target had the blue, and those suckers were dirt cheap. Something like $1.50 per bottle.
I do recommend spending the money on the plate mail metal by The Army Painter, as it goes on REALLY smoothly, and just works like a dream. You don't even have to use that much, I bought this one bottle about a year ago and I'm only about halfway through.

I also recommend using primer designed for miniature painting. I've used the cheaper stuff before, and the paint just doesn't stick as well, and it starts to slide all over the place. For today, I've used the Matt White spray on color primer by The Army Painter. Try to spray it from all angles from a decent distance away, to get a thin layer of primer. You don't have to make it COMPLETELY white, but you don't want any obvious sections where the plastic is showing through.
Once that's dry, it's time for basecoats!
2. Basecoats
For the uninitiated, all of the paints that I'll be using will be thinned with water to a 50/50 ratio with a few exceptions (which I'll go into later). This helps the paint go on smoothly and not retain any brushstrokes and let the sculpt be showcased.
In addition, since we might be painting multiple figures at once (since there are 12 of this sucker) I recommend getting a wet palette. The one I use is about $11 on Amazon, and works great to keep the paint from drying out and being a waste, which is great for when you come back to highlight.

The first thing we'll be painting will be the tunic. I used a size 1 brush for this part, and I typically live within the 1 to 000 range for mini painting. It really just depends on what you're comfortable with.

Don't forget to paint the small portion of tunic sticking out underneath the satchel on the left shoulder.

Next, you'll take the chocolate brown and paint the boots and the belt. Don't worry if you paint over the belt buckle of the Serf, it'll be pretty easy to cover up later.

After that, take your green and paint the patch on the left knee, the satchel, and the headband. This may seem odd to paint the patch on the knee before you paint the pants themselves, but this is really just so that we don't have to go back to colors after we're done with them, and it'll be easier to paint over the headband with the hair than to go in and try to fill in the gaps of the headband after the hair was already painted.

Once that's done, take your flat earth and paint the pants, pitchfork handle, and the hair. For the hair, don't be afraid to use your smallest brush to get the detail of each lock of hair and be sure to leave gaps between the locks in order to let the headband show through.

Now take your basic skin tone and paint the arms, chest, face, and hands. For the fingers, again, don't be afraid to use your smallest brush.

Next, you'll use your orange brown to paint the sack over the Serf's shoulder and wristbands. Nothing too special here, but be sure to paint both wristbands, and the mouth of the sack in his left hand.

The last thing you'll be basecoating will be all of the metal portions, including the belt buckle, metal portion of the pitchfork, and the metal studs in the green satchel. For metallic paint, I actually don't recommend thinning the paint at all, simply use it straight out of the bottle.
3. Shading
So, another thing that I recommend spending money on are proper washes. These watery inks fill in all the grooves of your basecoats, and help pull the paint job together. I predominantly use only Army Painter washes, because they're cheaper, and you can control their flow a little better. You can find a complete set of all of their washes on Amazon for only about $25 for 11 washes, and most of these, you'll only ever need to buy them once or twice every few years.

Today we're using four: Flesh Wash, Dark Tone, Soft Tone, and Strong Tone, but you should really only need one or two drops of each.
And before you ask, do not thin your washes. Use these bad boys straight outtaCompton the bottle.

Today we're using four: Flesh Wash, Dark Tone, Soft Tone, and Strong Tone, but you should really only need one or two drops of each.
And before you ask, do not thin your washes. Use these bad boys straight outta

Starting with you soft tone, apply a thin layer to the tunic. Just enough to accentuate the folds in the fabric, and do your best to avoid getting any on the skin, especially around the chest. If you do, simply dry off your brush, and use it to soak up any excess before it dries.

After that, take your dark tone and apply it to the pitchfork and handle, the hair and headband, the belt and buckle, the green satchel, and boots and pants. Again, only a thin layer to deepen the folds and add depth. Don't let it pool up too much around any given location and DEFINITELY try not to get any on the face.

Next, use your strong tone on the sack over his shoulder and his wristbands. You should really see how the wash accentuates and deepens the stitching detail in the sack.

The last thing you'll be washing will be the skin with your flesh wash. Just use a thin coat, and try not to let it pool up too much in any one particular area.
Now, let that dry for about an hour or so (less if you turn on the ceiling fan), and when it's COMPLETELY dry, we can move onto highlights!
4. Highlights and Finishing Touches
So, when we're doing highlights, we want to use our smallest brush. Personally, this is what I use my 000 or smaller for, and make sure that it's got a fine tip for those details.

The first thing we'll be doing is taking our dark sand and highlighting the tunic. You'll just want to paint the folds in the tunic and the top of the shoulder. A good way of figuring out where to put the highlights on the top of the right shoulder is to look at the mini from a bird's eye view and paint the portion of the tunic on his shoulder that you can see.

Next, using your basic skin tone, you'll highlight the skin, specifically the cheek bones, chin, nose, and the muscles and fingers.
For the face, just focus on the most pronounced portion of the cheekbone, ridge of the nose, or prominent portion of the chin. For the fingers, focus on keeping the highlight on the fingers and knuckles, and not IN BETWEEN fingers where the wash is darkest.
When it comes to the muscles, try to focus on the portions of the muscles that bulge outward, again avoiding the creases and areas that have been darkened most with the wash.

After that, take your orange brown and paint the sack on the Serf's shoulder. Again, avoid the areas most darkened by the wash, in this case the stitching, and only paint about the top 2/3's of it, leaving the bottom unhighlighted. This helps keep the satchel looking like it's round and full.
You can also highlight the wristbands as well, though it's not that big of a deal.

Now, use your flat earth to paint a line down the front of the pitchfork handle and highlight all of the folds in the pants in the front and back. Now would also be a good time to look at the top of the Serf's head from a bird's eye view and apply a little flat earth highlight to the top of the head/hair.

Next, you’ll take your green and highlight the satchel similarly to how you highlighted the tunic, by painting the folds that bulge outward.

The last thing we'll be highlighting will be the boots. Mix together a little chocolate brown and dark sand to get a slightly lighter version of chocolate brown and apply a highlight to the bottom of the boots' cuffs, the toes, and each fold sticking up near the instep. If you feel like you've gone too light, you can always wash it again with more dark tone.

The last thing we'll be highlighting will be the boots. Mix together a little chocolate brown and dark sand to get a slightly lighter version of chocolate brown and apply a highlight to the bottom of the boots' cuffs, the toes, and each fold sticking up near the instep. If you feel like you've gone too light, you can always wash it again with more dark tone.
5. Basing
So, you can totally stop right here and have a pretty rocking looking mini, but if you're willing, we're going to go the extra mile and make this guy really look great.

Start off by painting the rim of the base with your darker blue (thinned 50/50 with water of course). I chose this color because I thought it was a pretty close match to the original plastic, but you could just as easily paint it black or grey if you like.
Once that's dry, we're going to move onto the texture...

There are multiple ways to add texture to bases, but the easiest method is to get yourself some Vallejo Dark Earth Gel. It's a darker putty/paste that dries with a tiny grittiness to it, lending the illusion of ground. It's about $15 for 200(!) ml of it, compared to the GamesWorkshop stuff which is around $7 for 14 ml. Honestly, it's a good investment. I've done about 50 minis with it, and I haven't even gone through a quarter of the jar.

Get an old brush, or one that you just don't care about, with a relatively fine tip and just apply the paste over the base and around the feet. I just like to dab it on because I feel that's a more realistic ground pattern than trying to get it completely flat.
You don't have to use TOO much, but you want to make sure that the base is well covered and none of the unpainted portion shows through, because the dark earth will shrink as it dries.

Let the dark earth paste dry completely (it can take an hour or two depending on how thick you applied it) and then spray the sucker with some matte finish. I use Krylon Matte Finish because it's only about $5 per can at Joann's with some coupons.
Spray it on thinly, and don't use TOO much because too much can start to get cloudy over time.
Let that dry completely before moving onto the next step (usually only about five to ten minutes).

We are going to get some PVA glue (I use Aleene's Tacky) and we're going to mix that up with some water in order to apply some static grass.

Squeeze out some glue in a small container and mix in water until it becomes the consistency of a juicy loogie. Then it's just perfect.

Using a brush, apply some of the glue mix in some patchy patterns around the Serf's feet and pitchfork. Don't feel the need to completely cover the ground with glue and grass, because that will actually look LESS realistic.

Now take your static grass, I'm using Field Grass by The Army Painter, but if you want some real cheap stuff that works just as well, you should try WW Scenics static grass, which is originally made for model railroads.

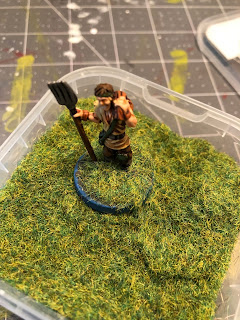
I just place the guy right there in the tub and sprinkle the grass, rubbing it between my fingers like you're adding spices while you're cooking, all over the base until you get good coverage. Let it sit for about 30 seconds before you take it out, and tap the bottom of the base to shake all the loose grass back into the tub. Give the mini a good blow, just to get the last remaining bits off grass off, and you should end up with something that looks similar to below.

Next, we're going to be adding some accent foliage in the form of lichen from the craft store, which looks like little tiny bushes. You can see I've torn a small piece of it and placed it next to the mini above so you can get an idea of scale.

A gallon bag like this will only run you about $5 from a place like Joann's or Michael's and it's really all you'll ever need.

Anyway, just like how you applied the static grass, choose a empty area of base near your mini's feet, apply the same glue mix that we applied before, and stick that little tuft of not-quite-moss on there. Feel free to push it down and hold it there for a few seconds to stick.
A good litmus test for making sure it's secure is blowing on the mini once again. If the lichen stays on, you're good to go.
VERY IMPORTANT: DO NOT SPRAY FINISH AFTER YOU'VE ALREADY ADDED GRASS AND FOLIAGE. If you spray finish after you've already added grass, the grass will start to clump together and you can even lacquer on some of the excess grass that didn't get blown off.
6. EXpand!

That's it, guys! Congratulations, you've just finished your first mini (or 12!). Keep checking back here on a regular basis, as we'll be moving through all of the figures in the base game (and hopefully more!). This, along with all of my Heroes of Land, Air & Sea tutorials will be available on my blog as well for reference!
If you liked this, or found it helpful, please consider becoming a Patron! Every dollar helps bring you quality ad-free content like this tutorial!
Until next time!
Remember to Share, Comment, and Subscribe!
Comments
Post a Comment