Become a Patron!
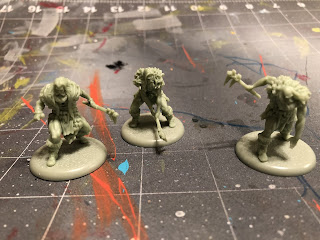
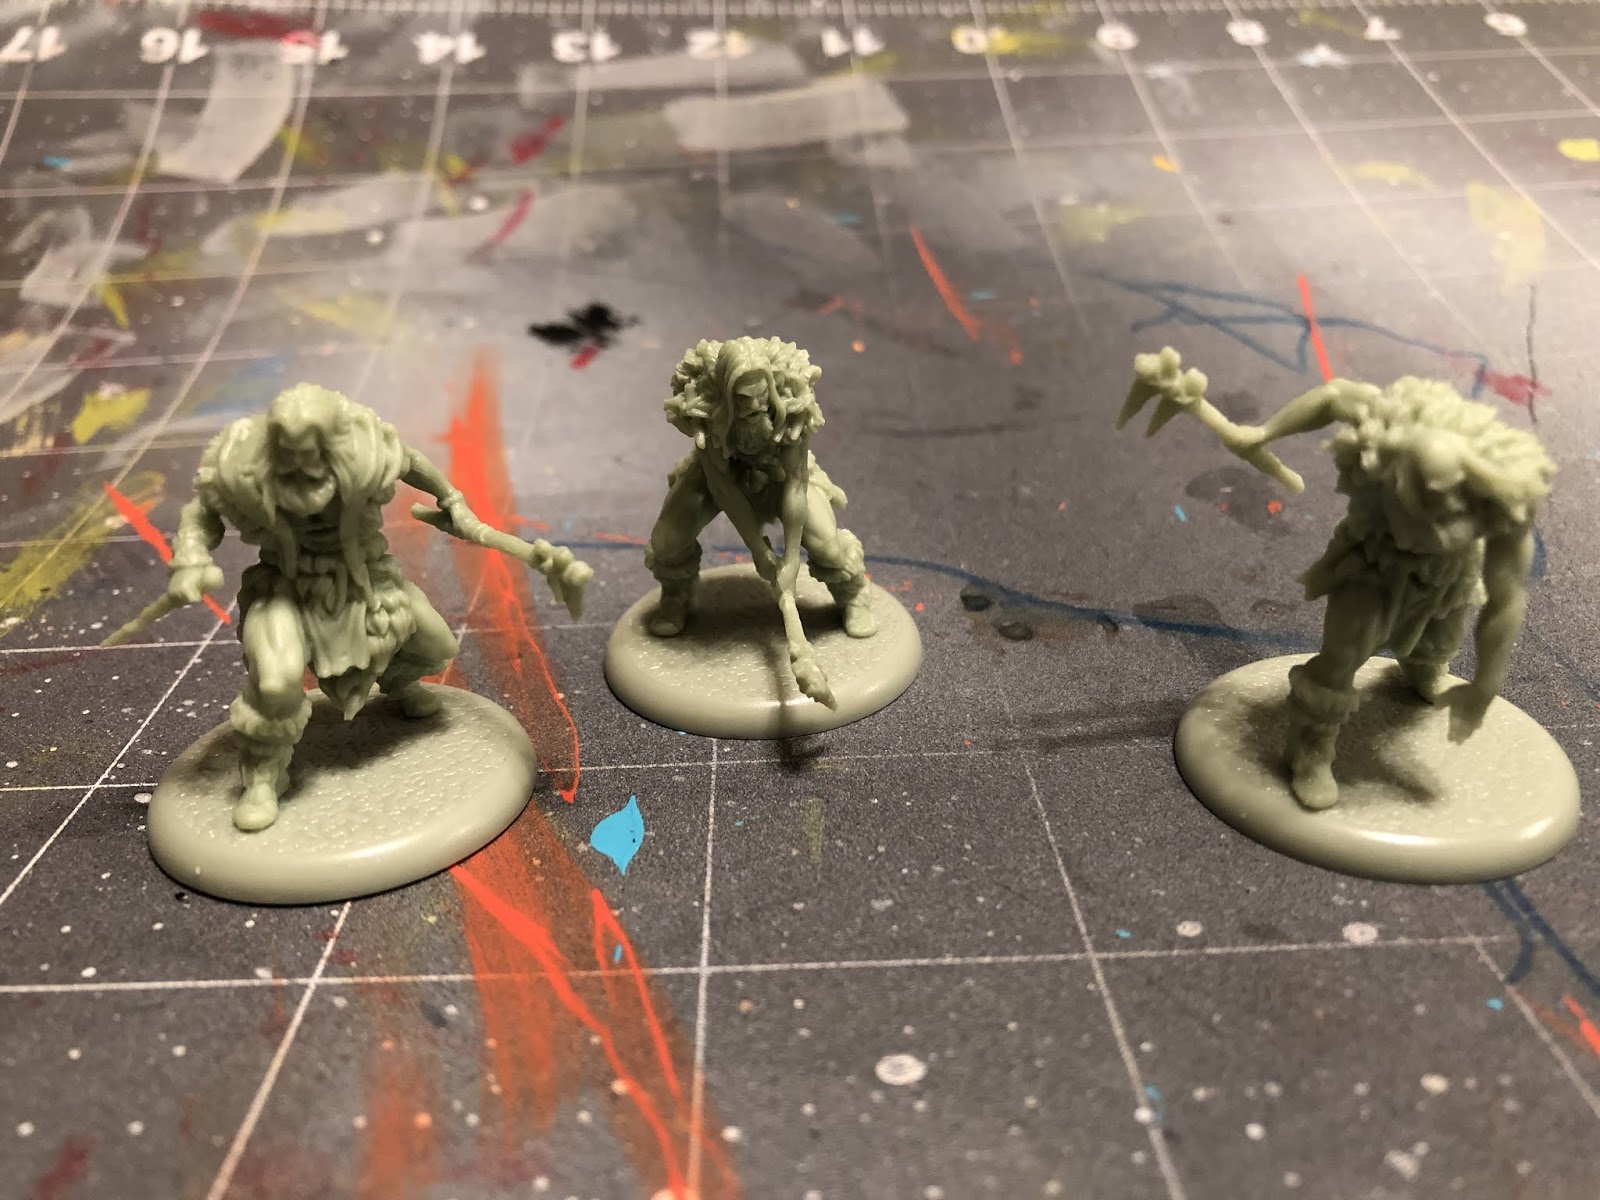
They have a darker complexion, but they're predominantly what we're used to with a various amount of browns. The unique thing about these guys is the facepaint they have on, which is not too difficult to paint, but if not done properly, can really look unnatural.
Here are the paints I've assembled for this unit:


 |
| by CMON Games |
“Everyone Hates the Cave People...”
Well, maybe not everyone, but I sure do! Especially when I’m playing against these guys. They are scary. They are like a Swiss Army Knife Unit that 100% has the chance to wipe an enemy unit off of the table with a few attacks. They are a MUST in any Free Folk army, so I guess it’s about time that we painted these SOB’s up.
Because these guys are Free Folk, and the horde aspect of the faction itself, we’ll need to find some shortcuts that will help us paint these guys up pretty fast, but still have them looking dynamic.
Before we get started, though, I have take time to give a HUGE shoutout to one of my Meeps/Patreon Supporter Anthony Johnston who sent me these bad boys when my FLGS was completely sold out! Thank you, so much, Anthony! You are a Magnar among Thenns!
Now, let’s see what we can do!
Before we get started, though, I have take time to give a HUGE shoutout to one of my Meeps/Patreon Supporter Anthony Johnston who sent me these bad boys when my FLGS was completely sold out! Thank you, so much, Anthony! You are a Magnar among Thenns!
Now, let’s see what we can do!
1. Gameplan, Prep, and Prime
Luckily, these guys have been featured quite a bit on TV. They're always telling me to buy Geico Insurance and complaining when I say something's so easy, even they could do it...
Oh, wait...
Wrong Cave Dwellers...

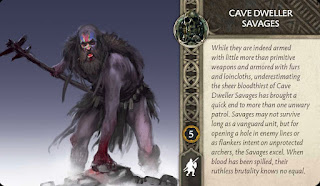
Okay, so these guys never showed up on the HBO series (not many aspects of the Wildlings did) so all we really have to go on is the in-game art:
Oh, wait...
Wrong Cave Dwellers...
Okay, so these guys never showed up on the HBO series (not many aspects of the Wildlings did) so all we really have to go on is the in-game art:

They have a darker complexion, but they're predominantly what we're used to with a various amount of browns. The unique thing about these guys is the facepaint they have on, which is not too difficult to paint, but if not done properly, can really look unnatural.
Here are the paints I've assembled for this unit:

Vallejo
Basic Skin Tone, Rose Brown, Dark Sand, Orange Brown, Transparent Blue, and Transparent Red
Ceramcoat
Black and white.
The unique colors here will be the transparent blue and red, as we'll be using them for the facepaint, but other than that, these should be some pretty familiar colors to you since we've been doing Free Folk.
I did not include colors for hair, as I figured that you should know how to do various hair colors by now between my other blogs entries.

I went ahead and used the Leather Brown spray on primer by The Army Painter to prime my figures, but be careful to go in thin coats from a decent distance away. The Army Painter's color primers tend to go on pretty thick and can obscure details.
You can, of course, simply prime white and then basecoat everything in Brown for the same effect.
Once your figures are dry, it's time to get started.
2. Basecoats
So, the first thing we're actually going to do, will be do drybrush on a little dark sand all over our miniatures.

With this going over the base primer brown, it really brings out the details, and for the fur, will provide all the highlighting we'll need for their clothing.
From here on out, all of our paints will be thinned 50/50 with water, so just a reminder.

Mix together your basic flesh tone and your rose brown in a 1 to 1 ratio, along with equal parts water. You'll use this to paint the skin. This provides a darker, rosier color to the skin, without it looking pink or brown.

Now, take your orange brown and paint all of the clubs of the weapons they're holding, along with the loincloth if you like. You may have to go over with multiple coats to get even coverage.

After that, take your white and paint the bones on this particular model. I also made the bone dagger thingy in his right hand this color as well.

Then, you'll mix up your black and white in a roughly one to one ratio and paint the stone blades in their club thingies. I've also chosen to paint this model's bracelet on his left wrist this color as well, though you could realistically paint it whatever color you like.

This next part can be tricky, as it does require a bit of brush control. Take your dark sand and paint the bindings on the clubs. This includes the wrap on the handle near their hands and the leather straps/twine that's holding the stone blades in place. If you can't really see the twine, it's in a figure eight pattern around both blades, like in the picture above.

Now, you can take this time to paint the hair and beards now, and when you're done, you'll take your transparent red and blue and thin it with JUST A TEENY TINY bit of water, and use that to paint a design on the faces.
For the design, I kept it simple. A slash of color across the face, something that looks haphazardly applied. Something like that. I've found that the more complicated the design you paint doesn't necessarily mean the better it'll look. Something simple is usually all you'll need.
Once that's all dry, it's time for shading!
3. Shading
We're keeping with our Free Folk theme here and we're only using a single wash today.

And that wash is Strong Tone by The Army Painter.

Apply the wash to the entirety of the figure. The skin, the clothes, the weapon, everything. Be careful when applying it to the skin, as you don't want it to go on too thick there, as it can look VERY dark when it dries. Just use enough to develop some shadows and depth to the leg and arm muscles.
Once that's dry, we're ready for highlights.
4. Highlights and Finishing Touches

So, I usually always start highlighting with the skin, and these guys are no exception. Use the same 50/50 mix of basic skin tone and rose brown to highlight the skin. You really want to paint the portions of the muscles that stick out on the legs and arms, the kneecaps and elbows, and the knuckles, making sure to avoid the darkened recesses that have been affected most by the wash.
For the face, just highlight the portions of the forehead, nose, and cheekbones that AREN'T painted. In the example above, it's just the center strip down the middle of his face.

Here's a top down view of the arm so you can get an idea of how to highlight them on this model...

And here's an idea of how to do the muscles on some of the other models. Notice how I try to highlight each muscle to make them all pop.

Next, take your orange brown and highlight the top of the clubs. The easiest way to do this is to look at the miniature from the top down, and simply paint the portions of the club that you can see, which would be the portions that the light is hitting.
You can also take this time to highlight any folds in the loincloths if you chose to paint them this color.

After that, you can take your white again, and highlight the bones adorning this model again. For the bone dagger, really just highlight the handle (?) and the ridge of the blade itself, to keep it looking worn and dirty.

Then you'll take your dark sand and highlight up all the wrapping on the clubs, in a manner similar to how you highlighted the clubs themselves. Just focus on the top portion, and only what the light would hit.
For the bindings around the stone blades, you could also highlight those as well, but don't worry about doing all of them. If you simply do two or three out of each figure eight, it should get the point across.

Now, you could TOTALLY call it a day there and be done with your mini, but if you REALLY want to make your facepaint POP, you can take these next steps.
Mix together some transparent red and basic skin tone along with some transparent blue and basic skin tone (not all together, you should have two separate mixed colors), and use those mixes to highlight the facepaint. As you can see above, I used those colors to highlight the face in a manner similar to how I'd typically highlight a face, just making sure that I use the correct color. So above, I used my fleshy blue mix to highlight the right eyebrow, the nose, and both cheekbones, while I used my fleshy red to highlight a portion of the forehead.
Try to stay in the center of the original basecoat of the transparent colors, because that helps create the illusion that the skin is starting to show through and it's darker in the areas that a face is naturally darker.

After you've sprayed these guys with your matte spray, I suggest that you bust this guy out. Tamiya Clear Red is a great way to apply blood and gore in small doses, and the Cave Dwellers are some of the only units in the game that currently have viscera on their in-game art, so let's take advantage of it.

I applied a little on the hand and dabbed it in little spots all the way up his arm, getting more and more spaced out the higher it gets. This gives a good spatter effect, as if he used one hand to do something bad, and the blood sprayed up to his shoulder.
The Tamiya clear red dries with a high gloss, too, so as long as you don't spray it with matt varnish, it'll look like fresh blood once it dries.

Here's an example of how I applied the Tamiya clear red to make it look like this guy just smashed someone over the head and blood spattered up the arms and onto the legs.
5. Savage the Countryside!

That's it, guys! Hopefully you found this guide helpful. You'll be able to find this and all my other painting tutorials for A Song of Ice & Fire on my blog. If this or any of my other tutorials have helped you out, I humbly ask that you consider becoming a Patron! Every dollar helps me bring you quality content on a regular basis.
And don't forget to like me on Facebook! If my Facebook page gets to 600 likes by the end of July, I may or may not be giving away a certain Starter Set for use with these fine gentlemen...
Until next time, Westerosi!
This comment has been removed by a blog administrator.
ReplyDelete