Become a Patron!

This guy isn't too difficult, but we are essentially painting two figures in one, so without further ado, let's HODOR! Er, I mean, let's get painting!
1.


2.


3.


4. Highlights and


 |
| by CMON Games |
“Hodor...?”
Alright, Guys. I know, around April first I released a “Hodor Tutorial” but don’t worry. This time, I’m suppressing my Hodor urges and you’re going to get a real one today.

This guy isn't too difficult, but we are essentially painting two figures in one, so without further ado, let's HODOR! Er, I mean, let's get painting!
1. HODOR! Gameplan, Prep, and Prime
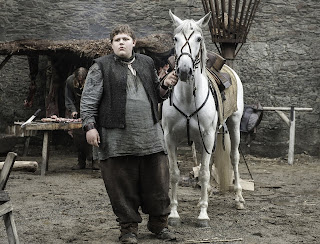
Okay, so, I know the card art for the game has Hodor as a ginger, but let's all just take a moment and be honest with ourselves. We all think of Hodor as looking like this:

Kristian Nairn was amazing in his role and turned the lovable gentle giant into one of the most sympathetic characters in the whole darn epic story. The only issue is that HBO's Hodor dresses nothing like CMON's Hodor... Or DOES he...?

I found this image of Hodor during a flashback, you know, BEFORE he was Hodor, and it's like the perfect match, so I'll be incorporating some of these colors into my paint job.


Vallejo
Basic Skin Tone, Dark Sand, Flat Earth, and Chocolate Brown
Army Painter
Plate Mail Metal
Hand Made Modern (Target brand)
Slate (Standard Grey)
Ceramcoat
Black and white
If you're unable to get these colors exactly, feel free to substitute any similar colors as they'd all work just fine.

For Bran and Hodor, I've decided to prime the figure white with matt white spray on primer by The Army Painter. Once that's all dry, it's time to start basecoating!
2. Hodor. Basecoats
Here's our quick reminder to thin all our paints 50/50 with water unless otherwise stated.

We're going to start off with our basic skin tone and painting all the flesh. Both Faces, Bran's hands, Hodor's arms, and Hodor's chest. Try your best to avoid Hodor's hair and beard and the fur as much as possible, but if you do get some paint on them, you can just cover it up with some of your white.

Next, take your standard grey and paint Hodor's shirt and the rock he's standing on. You may need to apply multiple coats of this to get an even layer over the white primer.

I also painted this portion of his shirt in the back, however, you could just as easily paint this the color of the vest we hears, it's really up to you.

After that, we'll be taking our flat earth and painting Hodor's pants and shoes. Nothing too fancy, just try to get a nice even coat. However, you should also take this time to paint the straps on Hodor's shoulders. I initially thought they were just extra folds in his shirt, but THEY ARE NOT, so don't be like me and wait until the very end to repaint them and take care of them now.

Then you can take your dark sand and paint the basket that Bran is riding in. Nothing too fancy here, just make sure you get a nice even coat.

And don't forget the small armrest that sticks out underneath Bran's left armpit.

Once that's painted, we can move onto Hodor's vest and Bran's doublet. Take your black and white and mix them in a 50/50 ratio and paint these parts of their clothing. This provides you a nice "Black" color that also allows itself to be darkened by the wash later.
As you can see, Bran's doublet makes a nice little "V-Neck", exposing his undershirt as it were. Don't paint the undershirt yet, we'll be moving onto that next.

Now you can move onto painting Hodor's belts and Bran's hair, sleeves, and the aforementioned undershirt with some chocolate brown. Again, this may have to go on in a few layers to get an even coverage on some areas, such as the belts.

The last thing we'll be basecoating will be the strings on Hodor's vest with some dark sand and his belt buckles with some of the plate mail metal.
You can also take this last moment to use your white to paint over any areas that we're keeping white, but you got some paint on, such as Hodor's hair and beard or the furs.
Once that's all dry, it's time for shading!
3. Hodor, Hodor... Shading
Even though Brand and Hodor have a fairly basic color palette, we're still going to be using a few different washes to give this mini some life.

We'll be using Dark Tone, Soft Tone, Strong Tone, and Flesh Wash, all by The Army Painter.

The first thing we'll be shading will be the skin. Use your flesh wash and shade Bran and Hodor's faces, Bran's hands, and Hodor's chest and arms. Take care not to not get any on the white fur when doing Bran's hands. It's not a big deal if a little gets on, but try not to get too much on, otherwise you'll have to paint over it.

Next, take your soft tone and paint the basket. As you can see, this gives the basket a nice, deep, wicker look to it, except we don't have to worry about Nicolas Cage or any bees.

After that, take your strong tone get ready to wash a few things. We'll be applying this to Hodor's grey shirt, so make sure you get the sleeves, the chest, and all of the small portions between the strings on his vest.
We're also applying this to Hodor's hair and beard. Once it dries and we highlight it back up, it'll look remarkably close to Kristian Nairn's salt and pepper look.
The last thing we're washing with strong tone will be Bran's fur. We're going to be washing both furs with different colors of shade just to add some interest to the paint job, but you could just wash them both the same color if you like.

Now we'll be taking the dark tone and washing Hodor's vest, pants and shoes, the rock he's standing on, his fur, and Bran's hair and clothing. Overall, just try not to let the wash pool in one area too much.
Once that's all dry, you can move onto highlights!
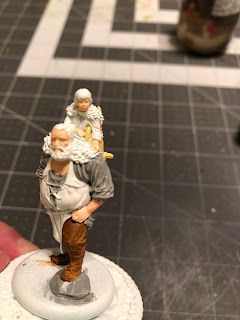
4. Highlights and Hodor? Finishing Touches

The first thing we'll start with for highlights will be doing a light drybrush on the fur of both Bran and Hodor. I ran out of my cheap stuff, so I ended up using Matt White by The Army Painter for this step, though any white will work. Just do a little bit on the shoulders and that should be good enough to make the fur pop.

Next we'll highlight the skin with our basic skin tone. For the faces, stick with our typical forehead, nose, and cheekbones (or in Hodor's case, lower lip), but for Hodor's chest and arms, try to highlight each muscle that bulges outward. Do a little bit of paint on the knuckles of each hand and the tendons that run up the back of the hand. If you ever get confused, just stick to the lighter parts of the skin that aren't as dark as the recesses and grooves due to the shade.

Here's an example of how you might highlight the palm of the hand and the under portion of the forearm.

After that, take your slate/standard grey and highlight Hodor's shirt. Again, focus on the folds in the shirt and anywhere the sculpt bulges outward. Try to avoid the darkened recesses of the model.

Here's an idea of how you might highlight the back of Hodor's shirt, including the sleeves.

Now we'll be taking our flat earth and higlighting up Hodor's pants and belts along with Brans sleeves and undershirt. Focus your effort on the left thigh, you know, the one that's Captain Morganing on the rock. The top of that will be what's catching most of your light, but also highlight the folds at the knee and toe and heel as well.
For the belts, simply paint a small line across the top of the belts, and for the sleeves, utilize the "Top-Down" highlights method by holding the model at a bird's eye view, and just painting the portions of the sleeves that you can see from that angle.

You should also highlight Bran's hair this way as well. Using your flat earth, just paint the top of his head, while avoiding where his hair parts. This should create a nice, natural gradient on top of his head.

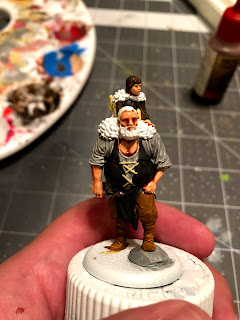
Now, let's take your white, and lets highlight up Hodor's hair and beard. Try to do it in a relatively patchy way, ignoring the side of his head and sideburns, as that will help emulate that salt and pepper look from the HBO series.

The last thing we'll be highlighting will be the basket with some dark sand along with the drawstring of Hodor's vest. Just focus on the center portion of where the basket weaves together, along with painting a highlight along the three posts the basket is connected to.
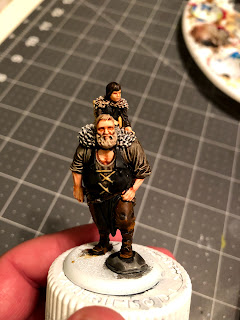
5. HODOR! HODOR!! HODOR!!!!

There you have it, guys! The Master Blaster of Westeros himself/themselves. Hopefully you guys found this tutorial helpful. This, along with all of my A Song of Ice & Fire tutorials can be found on my blog. If this, or any of my tutorials, have helped you out, I ask that you consider becoming a Patron supporter. Every dollar helps me to bring you quality ad-free content on a regular basis.
And don't forget to like me on Facebook! If my Facebook page gets to 600 likes by the end of July, I may or may not be giving away a certain Starter Set for use with these fine gentlemen...
Until next time, Westerosi!
Comments
Post a Comment