Become a Patron!


 |
| by Atomic Mass Games |
"Wakanda Forever!"
Welcome back, True Believers! Today, we're talking about one characters that come in the newest character pack for Marvel: Crisis Prototocol, the King of Wakanda himself: Black Panther.

This character is so cool, and really a simple paint job for beginners. Again, just to reiterate, I do not think that I'm the best painter in the world, but I have some simple techniques to get you to a solid tabletop quality of paint job that even the most amateur painter could do.
Still with me?
Great! Let's get to it!
1. Gameplan, Prep, and Prime
Okay, so even though when I think of Black Panther, I think of the version of him with a high collar and cape, for my paint job, I'm going to be basing it off of the traditional costume from the comics/films.

Jet black costume with the silver vibranium with the occasional blue highlight/accent.

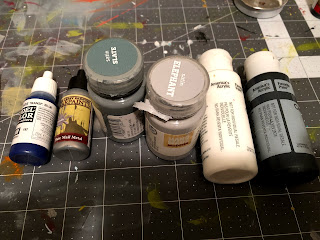
Here are the paints we'll be using.
Vallejo
Army Painter
Handmade Modern
Slate (standard grey), Elephant (light grey)
Ceramcoat
Black and White

As you can see, I've gone ahead and primed T'Challa with some black Stynylrez primer and my airbrush. This will do most of the heavy lifting for you, however, we're going to do more than just leave it black, so once that's dry, it's time for basecoats.
2. Basecoats
Here's your remember to thin your paints with equal parts water unless I say otherwise.

Mix up a 50/50 mix of black and white (and equal parts water) and paint the face, shoulders, and left thigh of Black Panther. This just helps add a little degree of highlight before we REALLY start working.
Once that's dry we're going to move to doing a drybrush, just like we did to finish Ultron, but we're going to start with the drybrush instead of finish with one.

Take your unthinned grey paint and your wedge brush and just give the whole miniature a good drybrush all over. Remember, when you're drybrushing, you should have almost no paint left on your brush, just trace amounts to catch the details of the mini.

After that, you'll take your light grey paint and do the same thing, but only on the top of the mini. Areas that would catch the light, such as the top of the head, the shoulders and back since he's hunched over, the left thigh and foot. Again, this helps give some more dynamic highlights that we probably won't have to redo later on.

Next, take your plate mail metal, unthinned, and paint all of the vibranium accents, such as the claws, the necklace, the belt, and the bracers around his forearms, wrists, and ankles.

Here's an idea of what the back would look like.

The last thing you'll want to do is use your plate mail metal, again unthinned, and your detail brush, and apply a thin line of metal along the ears and down the front of the mask along the eyebrow ridge.
Once all of that's dry, it's time for shading!
3. Shading
Again, we're going highlander style today! There can only be one!

Today we're only using Dark Tone by The Army Painter.
You can use Nuln Oil, but I chose dark tone specifically because it will darken the basecoats more than nuln oil would, and give us a richer Black Panther color.

Liberally apply the dark tone directly onto T'Challa. Cover everything, and don't push the wash around too much. Just let it sit and once it's dry, we can move onto finishing touches.
4. Finishing Touches

Get some of your white and your smallest detail brush and paint the eyes. You might take a few times to get this right, but don't be afraid to reapply dark tone to the eyes if you mess up and start over.
Again, try to roll your brush to a fine tip and do the best you can.

After that, take your transparent blue and thin it with about ten parts of water, so it's VERY thin and apply a thin layer to the eyes and the areas surrounding them, like the eyebrows and cheeks.
This will help give the eyes the look that they're glowing, and be an elementary level of object source lighting.

You can also take this time to apply the watered down transparent blue to the detail lines running across Black Panther's back, legs, and chest, just to break up the monochromatic look a little bit, though this is completely optional.
5. All Hail the King!

That's it, True Believers! Get this benevolent monarch on the battlefield!
This tutorial, along with all of my Marvel: Crisis Protocol tutorials can be found on my blog. If you found this helpful, please consider becoming a Patron! Every dollar helps me deliver quality content on a regular basis.
Comments
Post a Comment