Become a Patron!


Ranger Hunter Unit Box Giveaway!
 |
| by CMON Games |
Call in the Cavalry
So, while I have been painting quite a few mounted units, such as The Mountain That Rides and the Flayed Men, we haven't really had a chance to really showcase the horses themselves. That is not the case with the Stark Outriders.

The Outriders are considered "Light" Cavalry, which means that they're essentially just dudes on horses. Not armored up like the previous aforementioned mounted units. This gives us the opportunity to really show off a variety of breeds when comes to the horses, which I will definitely be doing.
*WARNING* This is a long tutorial, which is essentially four tutorials (one for each breed of horse) in one, so bear with me, though you could just as easily just follow the steps for one specific breed of horse and duplicate it four times.
1. Gameplan, Prep, and Prime
Okay, so I've got quite a bit of inspiration flying at you. Starting with the in-game art:

Pretty basic colors, similar to the Stark Sworn Swords, however, if I'm being completely honest, this is only part of my inspiration.
You see, I feel like the Starks are pretty down to earth folks, and they wouldn't care if their horses were all the same breed or purebreds. They'd just want to make sure they were the best horses they had, so I've assembled these four pictures of different horse breeds:
The Chestnut:

The Dapple Grey:

The Palomino:

And the Pinto:

My wife tells me that these are a little anachronistic, because most of them are American breeds, but I told her that there's no such thing as Europe or America, ONLY WESTEROS (and Essos, but I digress).
So, with that, I've assembled the following battalion of paints:

Okay, so we've got these paints from Vallejo: Basic Skin Tone, Chocolate Brown, Flat Earth, Orange Brown, Medium Flesh, and Dark Sand. From the Army Painter it's just Plate Mail Metal. From the Target I have a standard grey, a light grey, a light tan, a weirdo forest green, and black and white.
Now, this seems like a lot, because it is, but remember, not all of this will be used on every horse.

I've gone ahead and primed all my Outriders with Matt White by The Army Painter, and we should be ready to start painting!
2. The Fur
We're going to start off by laying down a layer of standard grey on all the fur sections.

This includes the fur mounted on the riders' shoulders and the fur underneath the saddle. Note that I don't actually do this for the fur on their bracers as I actually am going to keep that looking white.

Once that's dry, we'll drybrush on some light grey and then white in that order. We do this now so that we can paint over any areas that the drybrush process painted on accidentally, such as the cloak or the saddle, or the horse itself.
3. Basecoats
We're going to be starting with the horses, so I'm going to try to give them their own headers so you can follow along with me. Again, bear with me.
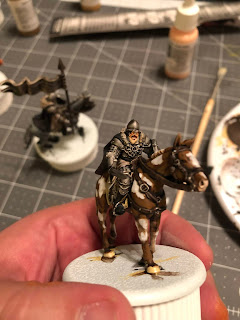
Chestnut

For the Chestnut Horse, we'll start with our orange brown. Nothing too fancy here, just paint up the horse's body, avoiding the mane, hooves, and rider/reins, though if you do get some on those portions, it's not a big deal as they're easy to cover.
After that, use your flat earth (standard brown) to paint the tail and mane. Make sure to get the little tuft of mane that's sticking up between the horse's ears.

This would also be when you paint the hooves chocolate brown as well.

The last thing for this horse's basecoat would be his nose and lips. Horses typically have one of two colors as their nose, either flesh or black. You can do either, but I chose to use flesh for this one, so I used my basic skin tone and just painted the tip of his muzzle, lips, and nostrils.
Dapple Grey
This is actually the breed of horse that is on the in-game art, so if you wanted to stay in-game accurate, this is how you'd go.
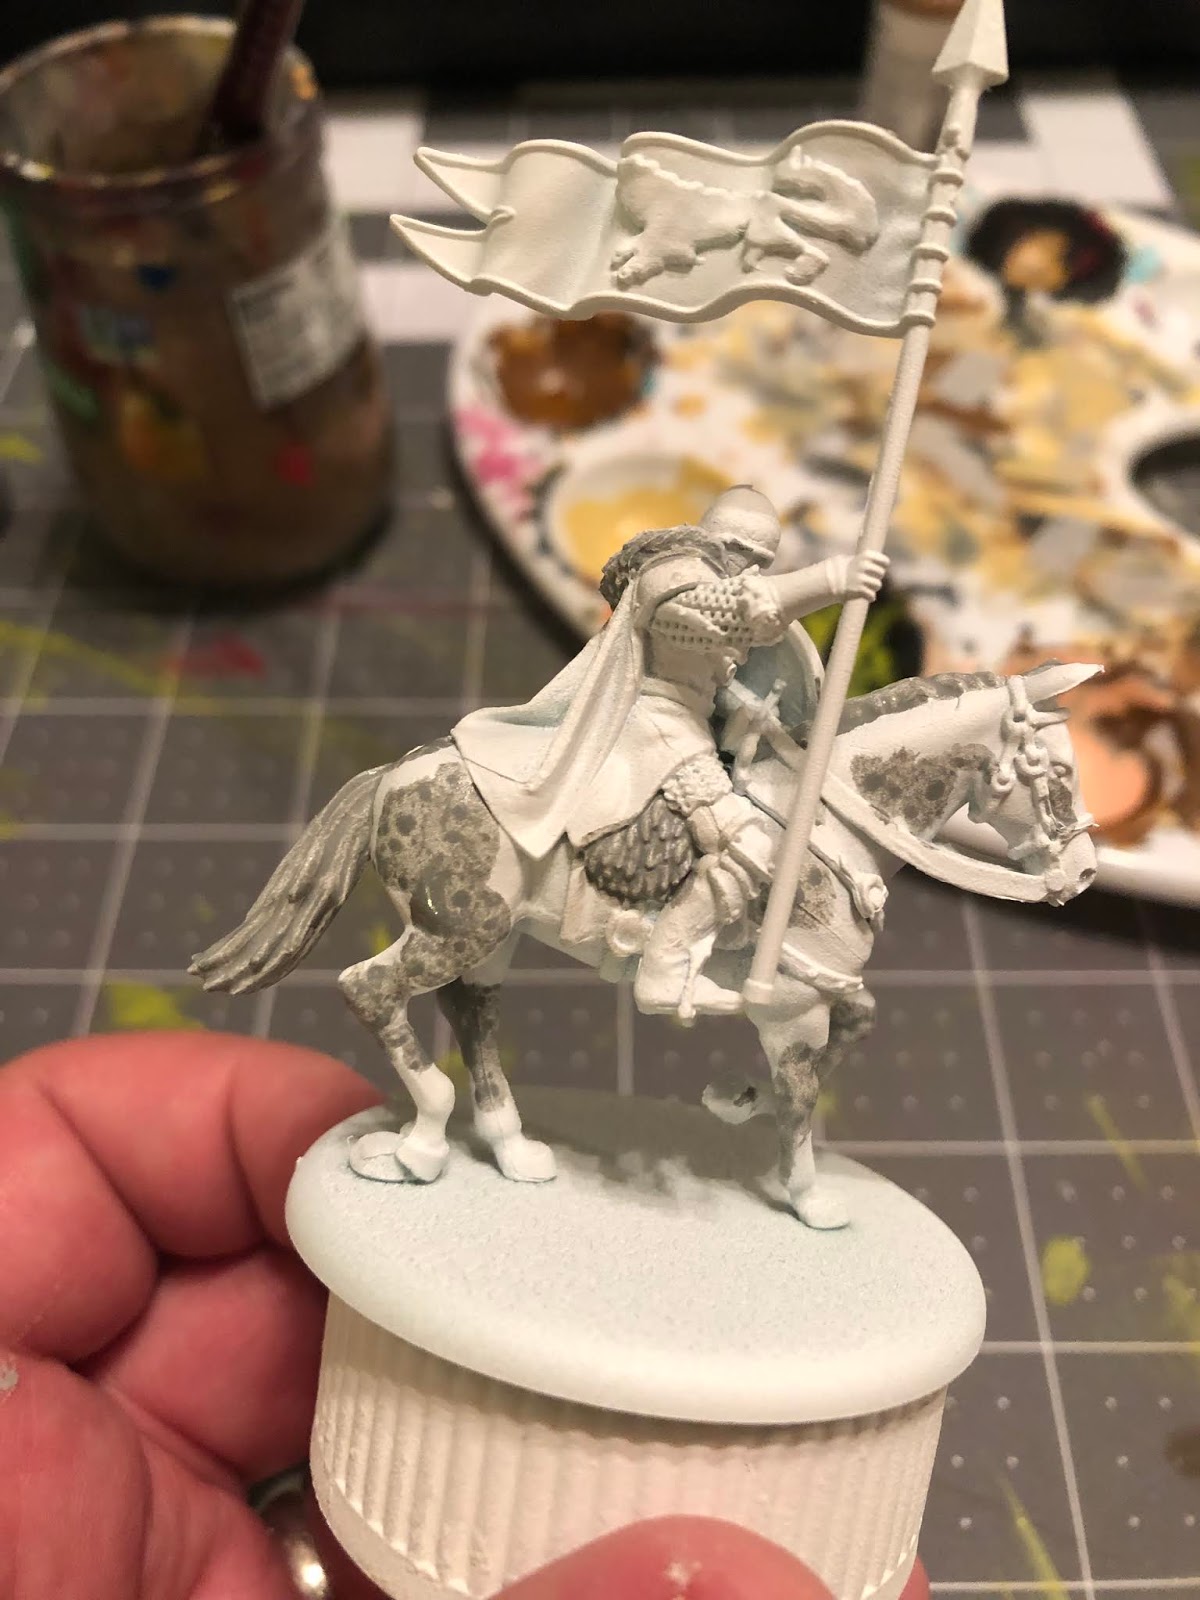
The Dapple Grey is named such, because, well, it's got dapples of grey on it! So, in order to replicate this look, we'll be taking our standard grey and instead of brushing the paint on, we will dab it on, one dot at a time. I used a size two brush in order to get a decent dot each time. Focus mostly on the rear haunches and the neck, but be sure to leave a good amount of white showing through. The coloration can be a bit random, so do your best.
Once the grey has been dappled on to your liking, you'll also take this time to paint the mane and tale this color as well.

Now, we'll mix up our 50/50 black/white mix and dapple THAT onto the horse as well. This black dappling is much more sparse than the grey that was previously been applied, and should really only be applied on top of the preexisting grey.
You can also use this to paint the hooves, inside of the ears, and nose and lips of the horse.
If after you're done, you look at it and think, "Wow, this looks awful." Don't worry. You're not wrong. But it will get better, I promise.
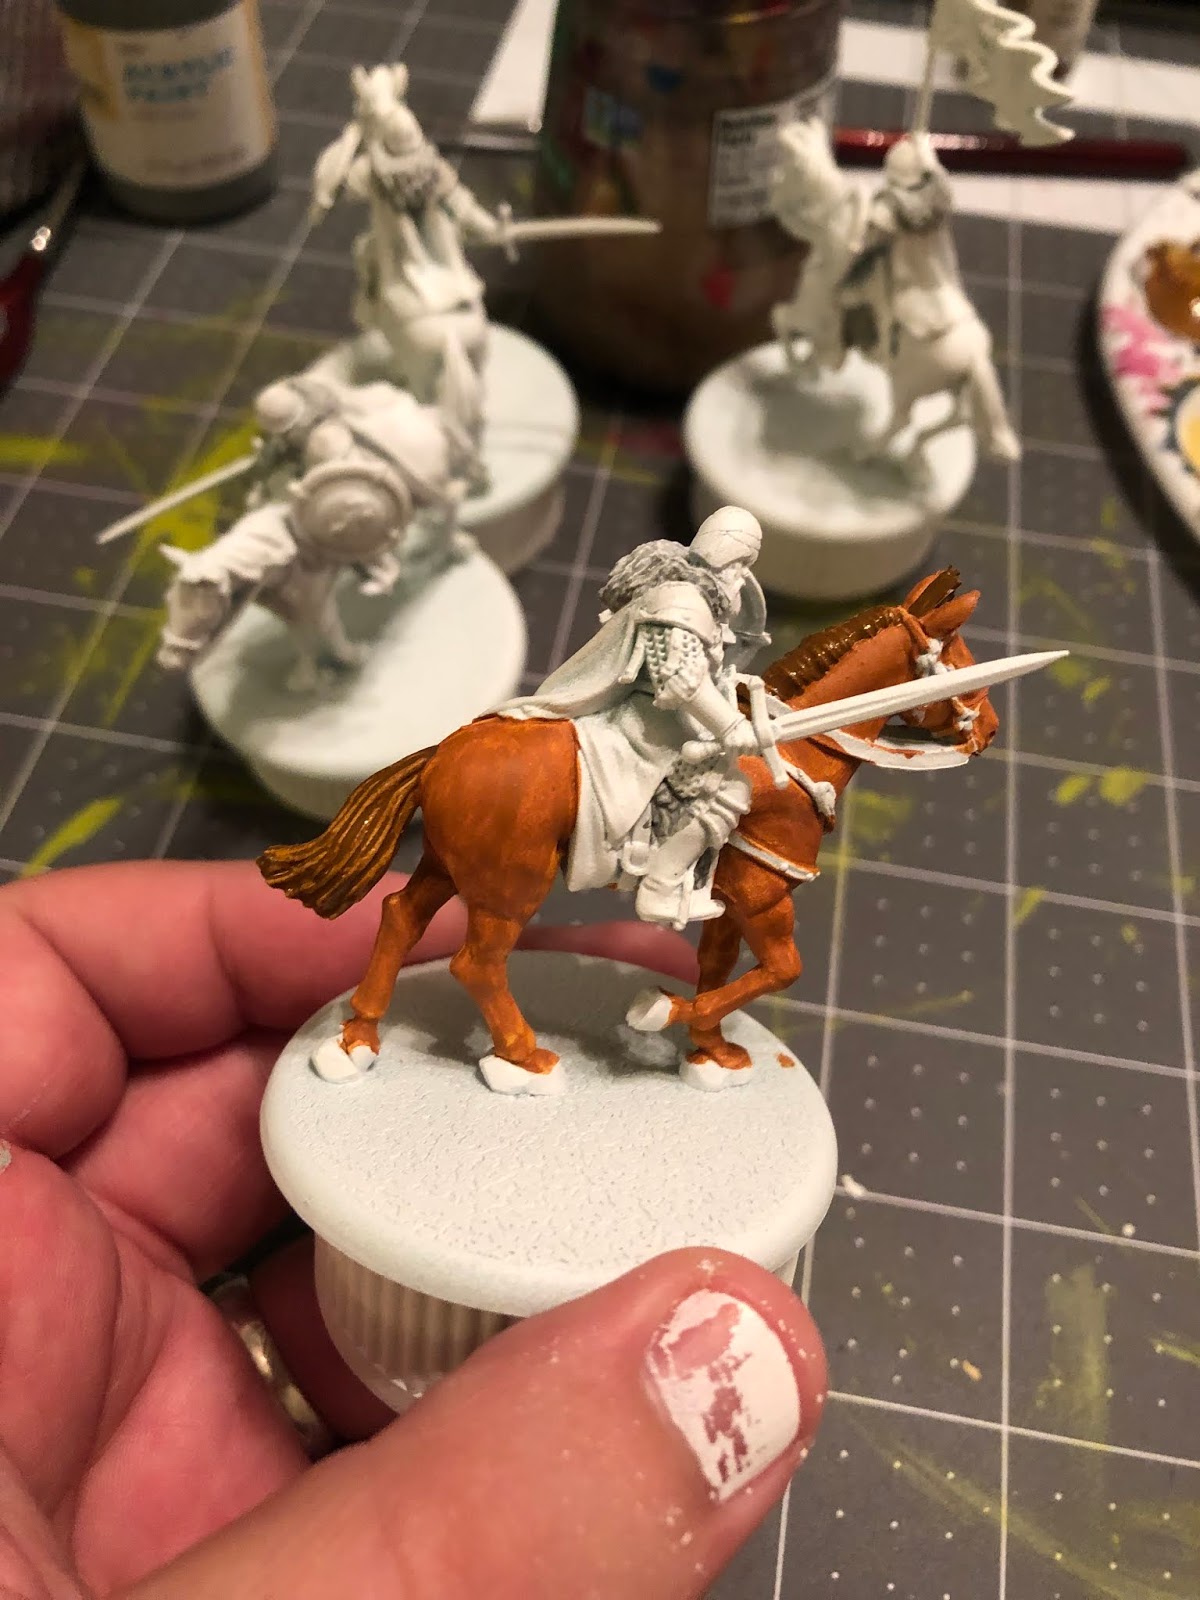
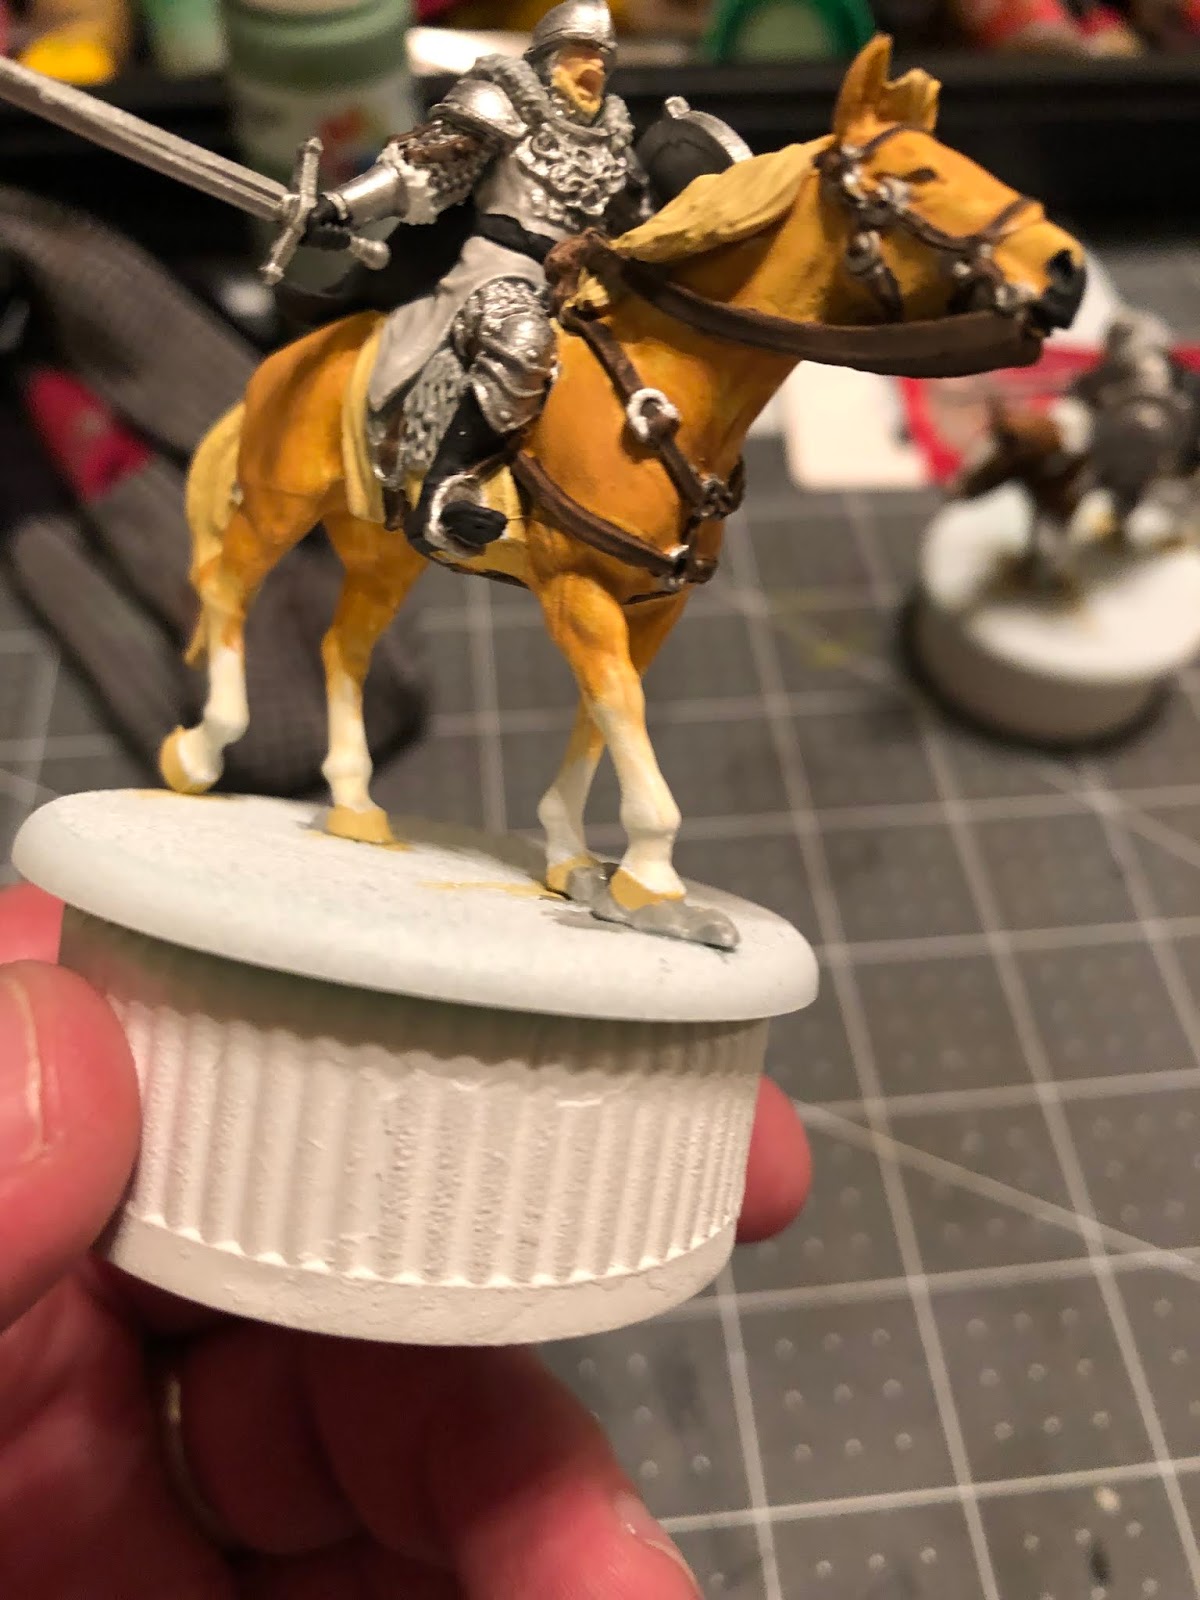
Palomino

We're going to start with our medium flesh and we're going to start off with the legs. As we approach the knees, we're not going to refill our brush, and slowly pull some of that remaining paint to the shin area. This creates a nice gradient between the blonde horse and white shins.

Now, we'll simply finish painting the rest of the horse this color. Everything but the mane and tail.

Once you're done with the body, paint the mane, tail, and hooves with your dark sand. Again, don't forget the tuft of hair sticking up between the ears.

The final thing for the Palomino would be to paint his nose and lips. Just like the Dapple Grey, I've chosen black, which is actually our 50/50 black/white mix.
Pinto

The Pinto is the painted horse that sports white splotches on their brown or dark brown hide. For this I've decided to use flat earth. I've tried to paint the brown over majority of the horse, leaving a few irregularly shaped white marks all over, including on the mane and tail. On the face of the horse, I've left a long white strip, similar to the shape of a comet.

You can also paint the hooves either dark sand or chocolate brown. I've chosen dark sand in order to mix it up.

The final thing to paint would be the nose and lips. Again, this can be either flesh or black, and I've chosen to use my basic skin tone.
The Riders
So, I'm going to be honest, the rider doesn't really matter that much. What we're really showcasing here are the horses, but I figured I'd give you a heads up on what I did with them as well.

I started with the tabard. For this, I used light grey. When you look at all the box art and card art, you see that all the Stark soldiers have different colored tabards depending on where you look. So, while my Sworn Swords have more of a blue/grey, I figured I'd go for more of a traditional grey.

Next, paint all of the riders' faces with basic skin tone. Nothing fancy. Just try to get a good coverage, and don't forget the lips of those with the full bushy beards.

Now, use your dark sand to paint the blanket underneath the saddle.

I also chose to paint my riders' beards this color as well, to give them almost a Norse look, and break up the constant brown hair that is plaguing my crop of Starks.

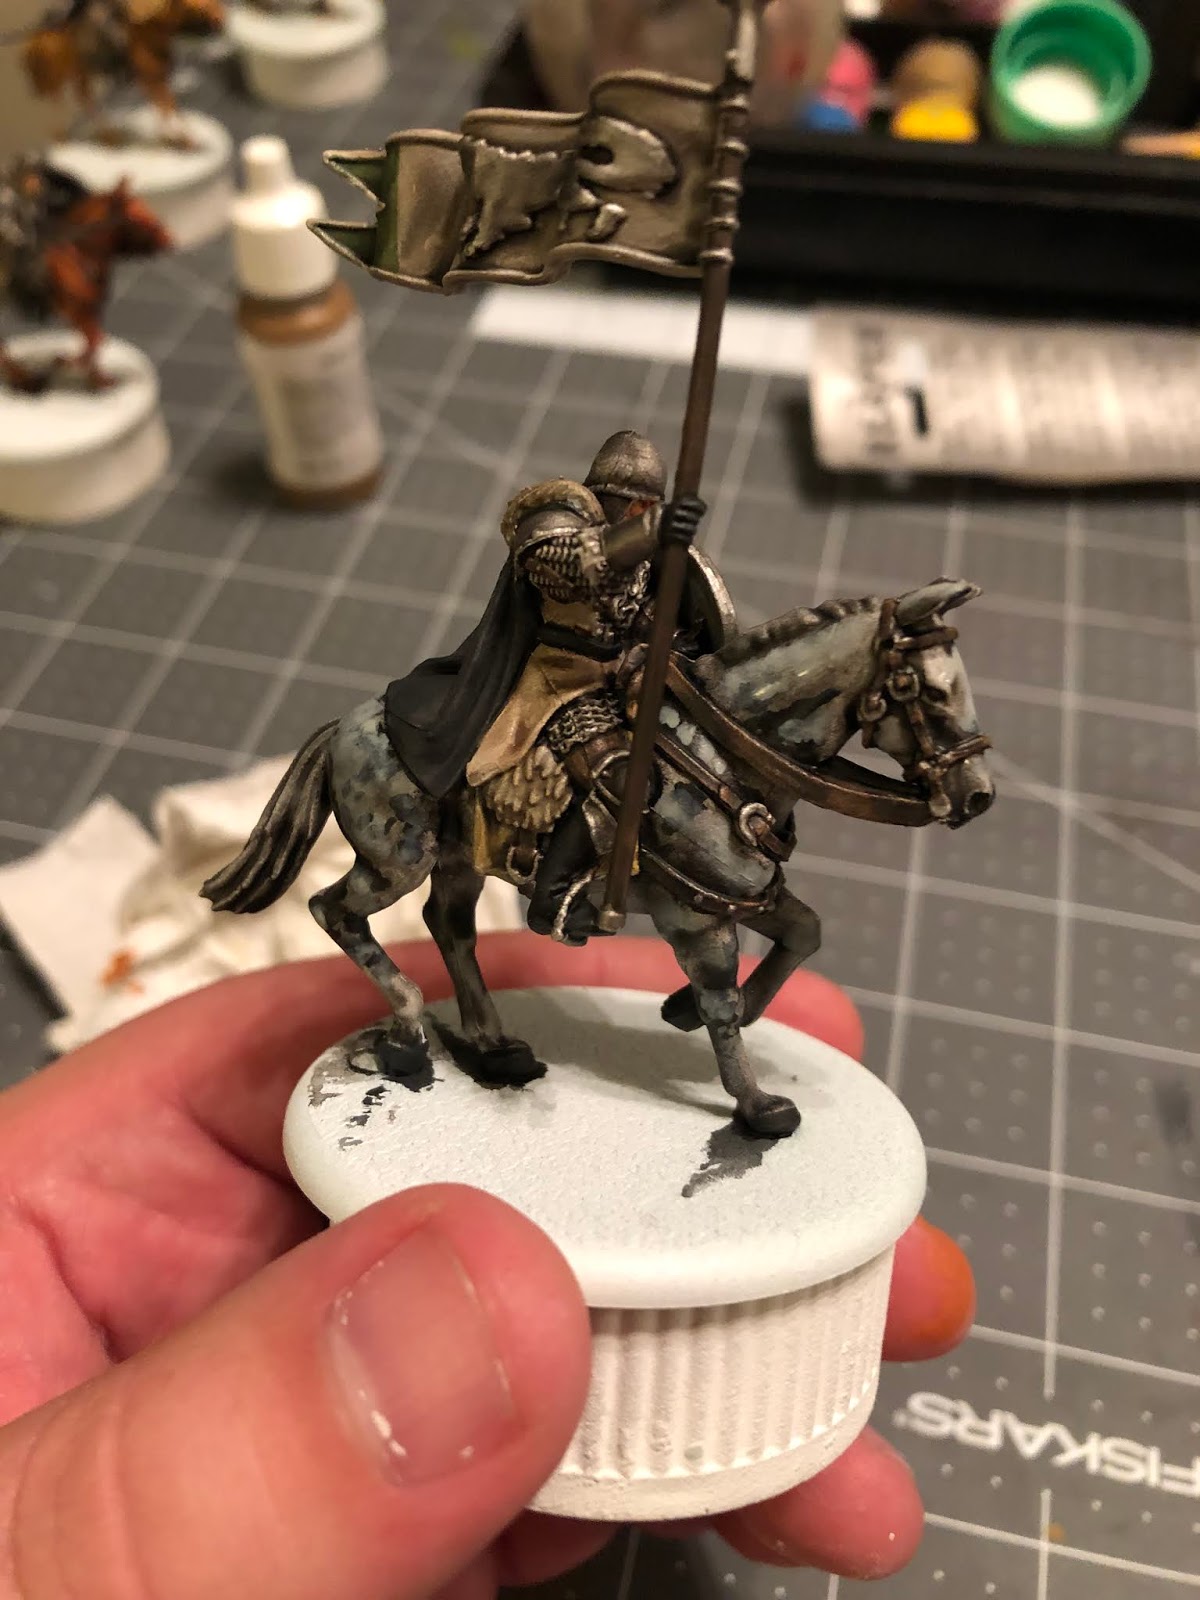
After that, we will be painting all of the straps for the horses' rigs chocolate brown, along with the flagpole. This is also the time to paint the pants of the riders this same color along with the horses' eyes using your detail brush.
Next, I painted the field of the flag the light tan color, as I'm trying to emulate the look of the Stark banner in the HBO series.

Once that's dry, you can take the weirdo dark green and paint the points of the flag on both sides.

Now we move onto a LOT of the heavy lifting for the soldier, the armor. Using your plate mail metal, paint the shields, swords, and all of the armor of the riders. This includes their bracers, knee pads, pauldrons, helmets, their breastplate, and the chainmail skirt and sleeves.
This is also when you'll paint the buckles and stirrups of the horses, along with their bits.

On the flag, you'll also paint the direwolf logo with plate mail metal as well as the speartip, rings securing the flag to the pole, and the metal portion at the base of the flagpole.

Now, we'll mix up some of our 50/50 black/white mix and paint the cloaks, boots, belts, and gloves of the riders.
The last thing we'll basecoat will be the little rocks on the base using your standard grey, though, honestly, any rock-like color will be fine.
Once all of that is dry, we're ready to start shading.
4. Shading
Chestnut


Simple enough, the red tone goes over the entire horse, even the mane, tail, and hooves, but avoid the straps, the saddle or the rider.
Dapple Grey


Just like the Chestnut, we'll be using the dark tone to cover the entirety of the horse, trying to avoid the rider and straps as best as possible.
Palomino

For the Palomino, we're actually going to be using two different shades for the horse, Light Tone and Soft Tone.

We'll be using the light tone on the horse itself, all the way down to the hooves, except the mane and the tail. Yes, even over the white shins.

Now use the soft tone on the mane and tail of the horse. This is similar to what we did when painting the hair of the Lannister Siblings.
Pinto


Simply apply the strong tone to all parts of the horse, including the white portions and the mane and tail.
The Riders

For the riders, we'll be using three different washes: Dark Tone, Strong Tone, and Flesh Wash by The Army Painter.

We start by applying the flesh was to the faces of the riders. Just like with the basecoat, don't forget to apply it to the lip as well.

After that, we'll be applying strong tone to the fur on the shoulders and under the saddle, the beard, and the tabard. This may give the tabard a brown tint, but that's okay because we'll be highlighting it back up to grey.

We'll then be applying dark tone to the rest of the rider, and I started with the flag so that I would not forget it.

Apply the dark tone to the armor, shields, the fur at the elbows, swords, flagpole, the saddle, all the straps and buckles on the horse, the blanket underneath the saddle. All of it. Don't be afraid to use your detail brush to apply the wash to the straps on the horse, as you don't want to get it on the horse itself, and those leather straps can be very thin.
Once that's all dry, it's time for highlights!
5. Highlights and Finishing Touches
So, overall, we'll be highlighting the horses with the same basecoat we used on them, whatever that may be. We want to pick out all of the muscles that bulge outward, but leave the darkened recesses between the muscles.
Here is an example of what I mean on the Palomino:

Yes, this is on the Palomino, but you can use it as a template for where to pick out the highlights for each horse.
Chestnut

Using the orange brown, highlight the muscles of the Chestnut as shown above and be sure to highlight behind the ears.

You also want to highlight the face, and bring the nose back up to the flesh color by highlighting it with your basic skin tone.

For the mane, you'll apply the flat earth to the top from a bird's eye view, and pick out the occasional highlight of hair that you want to trace down the side.
In regards to the tail, drybrush some flat earth to the back and sides of it, and you're good to go with the Chestnut.
Dapple Grey
For the Dapple Grey, you'll be using your standard grey once again, and again, instead of painting it on, you'll be dabbing it on in dots on the muscled areas like above. The translucent nature of the paint should leave a little bit of the black and white and grey pattern from the basecoat showing through, while giving us a nice natural looking highlight.
The only things you'll be painting will be the back of the ears, the mane, and the tail. For the mane, you'll paint the top of it from a bird's eye view like described above with the standard grey, and drybrush your light grey on the tail.
Palomino

With the Palomino, take your medium flesh again and highlight all of the musculature of the horse, including the face and behind the ears.

Now, using your white, just highlight the ankles of the horse, and a little bit of the shin. Don't take it all the way up the the knees and it will still give a nice gradient between the blonde and the white.

For the mane, use your dark sand again to highlight the top from a bird's eye view, and you'll drybrush this same color onto the tail.
Pinto

The Pinto is a little bit more complicated because we'll be mixing the white and brown spots within a single highlight, but the answer to this is to take it one color at a time. I started with flat earth, and highlight all of the brown sections of muscle. I also don't get too close to the "White" spots.
Highlight the mane in a similar fashion, from the top down perspective, and drybrush the flat earth onto the brown section of the tail as well.

Moving onto the white spots, take your white and do the exact same thing you did with the brown. Painting the white sections of the horse's muscles and mane, while steering clear of the areas where the brown and white meet.

You'll also want to highlight the nose and lips of the horse with basic skin tone as well.
The Rider

Since we've got that basic skin tone out, when we move onto the riders, you can use that to highlight the cheeks and nose of each of them. Use your detail brush, and just a little dot in the center of each cheek should do it.
If you feel brave, you can also highlight the lip at this time as well.

After that, we'll move onto the tabard. Using your dark grey, highlight all of the folds in the cloth, and a little bit on the flank of the rider where it's about to meet the belt.

Next, you'll take your dark sand and highlight the cloth underneath the saddles. Just the folds that billow outward, so not much to do here.

This is also the same color you'll use to highlight the riders' beards if you chose to give them this color. Use your detail brush, and go as slowly as possible. These are VERY fine highlights.

Now, using your white, you'll apply a top-down highlight on the fur near the elbows. Don't worry about getting both arms, as the one obscured by the shield would be in shadows anyway!

The last thing you'll be doing is mixing up your 50/50 black/white mix, but with twice as much white (1/2 black/white) and highlighting the cloak, boots and gloves. For the cloak, try to get all of the folds of the cloak that billow outward, and the shoulders.
When working on the gloves and boots, it's really just the top of the hand, fingers, and toes that need the highlights.

Now, we'll highlight the leather straps, pants, and flagpole with flat earth. For the flagpole, simply paint a line down the back side of it, and apply top down highlights for the pants.
For the saddle/reigns/leather straps, you'll apply a stripe of flat earth along the top ridge of all the leather. Again, this is a very fine highlight, so don't be afraid to use your detail brush.

For the last highlight, we'll be highlighting the flag with the same colors we used to basecoat it, the light tan and the weird green. You can see I've only highlighted where the flag billows towards me in regards to both colors. Again, use a smaller brush for this, as you don't want to get any tan on your plate mail direwolf.
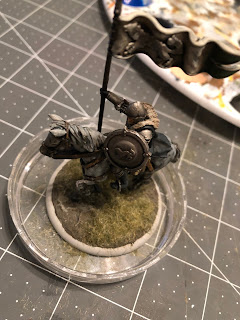
BONUS! Basing and Terrain
Okay, so I want to start off by saying that I am VERY new to the world of basing and terrain, so I don't know much about it, but I've been getting a lot of requests for it. This may or may not be how you base your stuff, but this is what I've been doing that has been working for me. If you do terrain and basing differently, PLEASE TEACH ME! I'm such a noob when it comes to this aspect. That said, here's what I do.

As a base ground texture, I use Vallejo Dark Earth. It's relatively cheap ($15 for 200ml) and gives some color and realistically sized grit for the base.

So, I apply the Vallejo Dark Earth to the base with an old worn out brush. I just dab it on there, and I don't try to get it too even, because the ridges and dimples in the application look more realistic than a flat even surface. This can take a long time to dry (my Outriders took 3 HOURS), but once it is dry and hard, you can drybrush on 2 colors.

The type of ground that you're looking for will have an effect on which colors you choose, but for the Starks, I'll be starting off with a drybrush of flat earth. You can see the lighter brown color contrasts with the dark brown color of the dark earth.

So, with the Starks, in order to simulate a icy dew forming in the mud, I'll be drybrushing light grey as my second color. It helps give the look of ground frost. Once that's done and dry, I make sure to spray it with my matt varnish before I move onto adding grass and foliage.

For my Starks (and Boltons for that matter) I've been using Winter static grass by Gale Force Nine. You can get static grass cheaper if you go through model railroad scenery companies, however, they did not have the right color for my starks, so I'm using this. It's about $4 for one of these small containers.

Mix up some PVA glue with some water, I use Alene's Tacky Glue, until it gets to be the consistency of about a big wet loogie.

Once your varnish is completely set and dry, apply some of your glue to the base in as random a pattern as you can, similar to above.

Now, I set my figure in the lid of the static grass container to try to catch some of the static grass as I sprinkle it onto the glue, because the grass will get everywhere. Make sure you sprinkle the grass as well, not just dump the grass, as you want it to fall into the glue as individually as you can, and not just in a clump.

After about 30 seconds, you can take the mini out and shake the excess static grass off, tapping the bottom a few times. I also like to blow on it a little to get the last remnants off, and help the grass that is applied to stand up a little better.

I use two different kinds of foliage accents. The first will be a Frozen Tuft by The Army Painter from their Battlefields XP series (runs about $4 for a set of 77).

I take a big dab of my glue mixture and apply it to one blank area of the base.

Now, using some tweezers, I'll place a frozen tuft in the glue, pressing it down for about 10 to 20 seconds, just long enough for the glue to start to set and get sticky.

The next accent will be this moss (it's actually lichen, but whatever) from the craft store. I got this on clearance for $2.50. I usually only use this with cavalry units to give it an extra accent, because we have the room on the base.

Tear up a small roundish clump for each of your figures. I've included the figure in the picture above so you can see the scale.
Using the same technique as the frozen tuft, you'll glue the moss onto the base. A good technique to see if the moss is firmly affixed is to blow on it. If it doesn't fly off, you're good!


There's no real way to tell you how much to mix in, but you'll want to mix in water, glue, and the snow until you get a consistency similar to toothpaste.

Dab this snow mixture onto the base wherever you like. You can even add this on top of the foliage and grass that we've already applied. The particular formula for snow that I've given you is a good representation of melting snow, which is perfect for a patchy application.
You can even brush some of this onto the front of the horses and the boots of the riders to make it look like they've been trudging through the tundra.
6. Outflank the Enemy!

Well, it was a long one, but thanks for sticking with me! Now, we have a good idea of how to paint four different breeds of horse (six if you include the ones we've done previously) AND I gave you the terrain tutorial all of you have been clamoring for!
If you enjoyed this or found it useful, please consider becoming a Patron, every dollar helps me to provide quality weekly content for you AD-FREE and if you're reading this before Christmas 2018, be sure to check out my Ranger Hunter Giveaway for your chance to win a Ranger Hunter Unit from the Night's Watch Faction!
Until next time, Westerosi!
I like the Dapple Grey.
ReplyDeleteThanks, Stephen! It’s a scary horse to paint because the basecoat step leaves it looking awfully weird.
DeleteThis is my favorite tutorial
ReplyDeleteThe palomino was my least favorite until the end . It turned out the best imo
ReplyDeleteThat’s funny! I honestly think the Dapple Grey is the scariest when you’re painting it, because until you wash and do the the dapple highlights, it looks pretty dumb lol.
Delete