Become a Patron!


 |
| by CMON Games |
"A False Knight... Lord Tywin's Mad Dog..."
So, in the A Song of Ice & Fire Miniatures Game, all of the Units in the game are made up of a number of different troops to form their squad. Infantry is 12 and Cavalry is 4. Going solo in the battle is usually a task reserved for Direwolves or Giants. You know. Monsters.
Well, the Lannisters have their own Monster, as well, and his name is Ser Gregor Clegane.

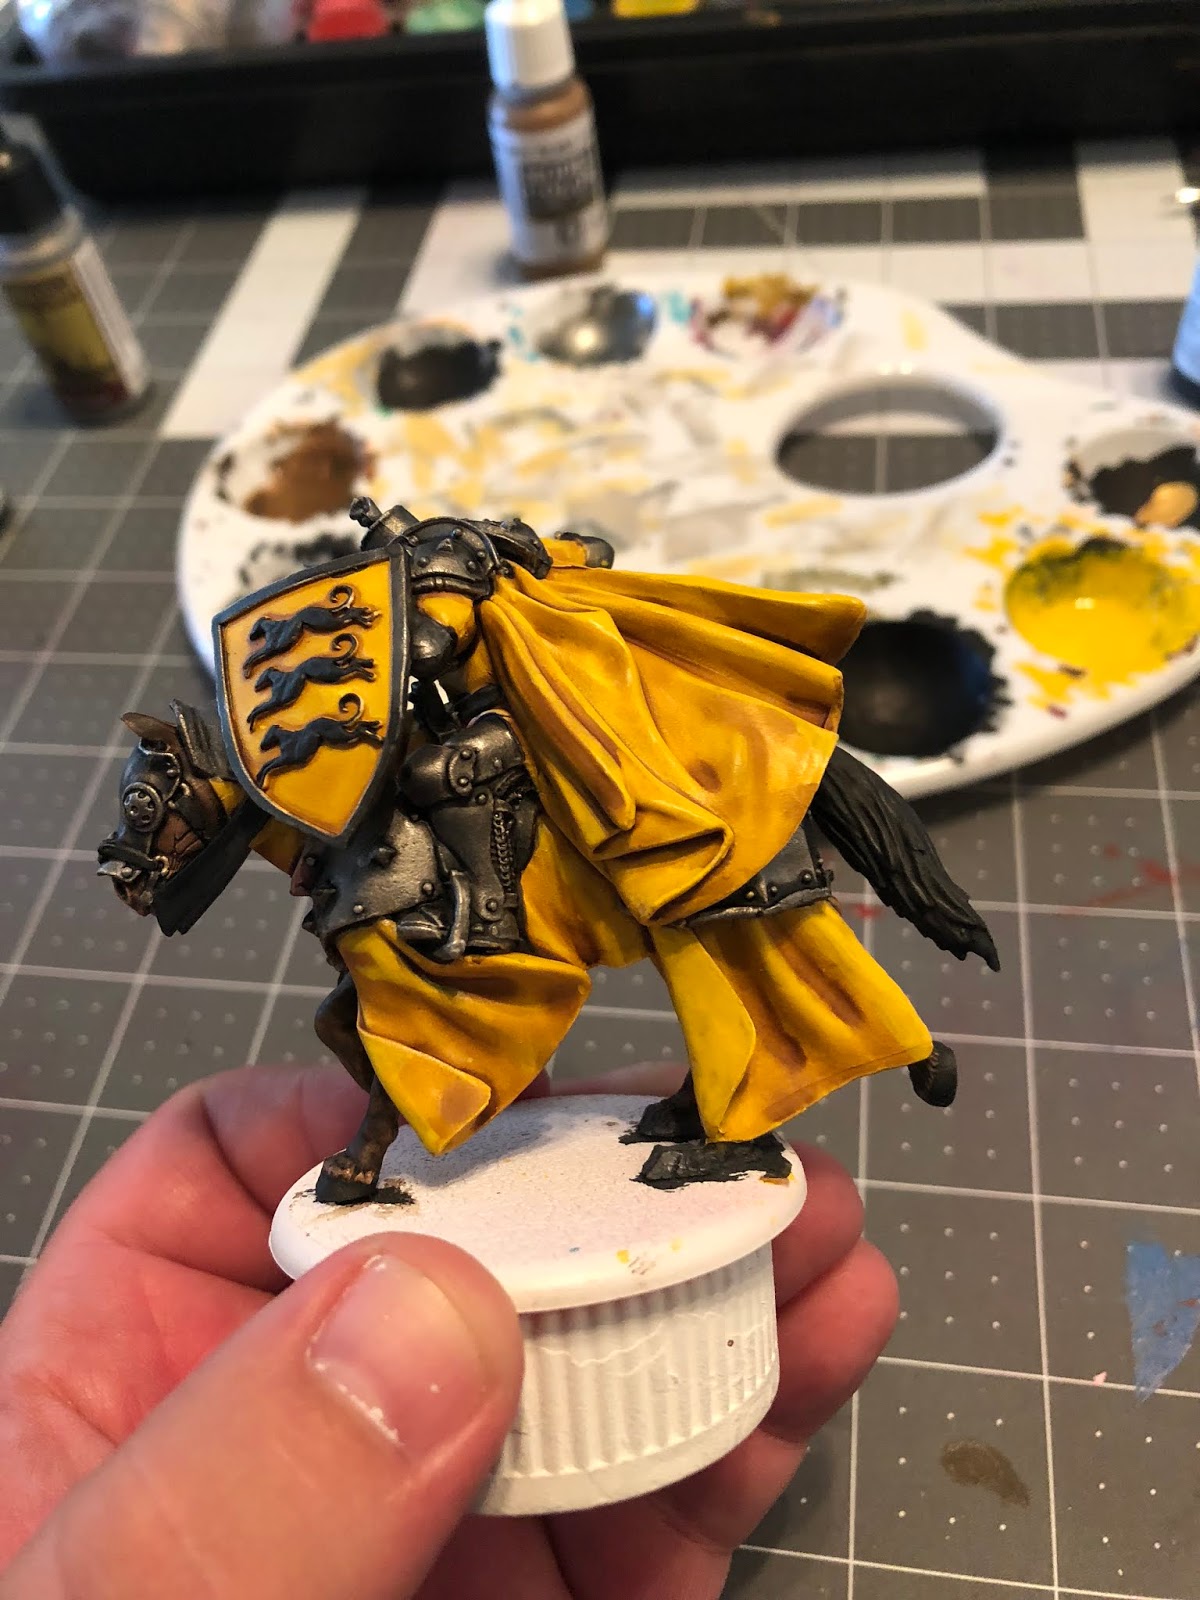
Man. Look at that beast. Look at all that PLASTIC!
While he may not be the most complicated paint scheme that we've covered, he is one of the more difficult due to trying to maintain the contrasting colors of yellow and darkened steel, so buckle up, this one might be rough.

Man. Look at that beast. Look at all that PLASTIC!
While he may not be the most complicated paint scheme that we've covered, he is one of the more difficult due to trying to maintain the contrasting colors of yellow and darkened steel, so buckle up, this one might be rough.
1. Gameplan, Prep, and Prime
So, overall, we're going to be using the same gameplan for when we painted the on-foot version of Ser Gregor:

The only real difference this time is that we have the added concern of his horse. As you know, I try to base my work for A Song of Ice & Fire off of the HBO series (I know, I know...) so I found this great image of Gregor lovingly attending his horse.
 |
| Ah, the unbreakable bond between a knight and his steed... |
As you can see, the horse itself is a dark chocolate brown with black hair. Combine that with the in-game art:

And I think we have a pretty clear picture of a color scheme. As such, I've assembled the following paints:

From Vallejo, we've got Gunmetal Grey, Chocolate Brown and Flat Earth as well as Plate Mail Metal by The Army Painter. From the Target and the craft store, I'm using this goldenrod (which is the same paint I used for the on-foot version) and then black and white for my 50/50 black/white mix.

When priming, take care to try to get as much of the figure as possible. This model has some really awkward crevasses that can be hard to reach, so take some time and make try to spray the model from all sorts of weird angles. Like always, I've used matt white spray-on primer by The Army Painter.
2. Basecoats
Like always, all of the paints during the basecoat stage will be thinned 50/50 with water unless otherwise noted.
I'm using my size 2 brush for most of this, which is larger than what I typically use, but this mini is larger what you'll typically paint, so it'll help me get more even coverage faster.

We'll be starting with the horse itself. Get your chocolate brown, turn that sucker over, and go to town on the figure's undercarriage and legs. Try to stay in the middle of the horse. If you get a little on the horse's caparison (the cloth draping) it's okay underneath, as that part of the model won't really be under too much scrutiny, but it will be a pain to cover up with the yellow.

Finish off the horse's ears, muzzle, and what little face you can see. Note that I did not paint the neck, because in my mind, that looks to be cloth, and I will be painting it as such, however, if you want that to be your horse's exposed neck, make sure you paint that as well.

Now, we move onto the Mountain's tunic, cape, and the horse's caparison using your yellow, or in my case, goldenrod. Also take this time to paint the yellow field on the shield. One of the benefits of priming in white is that these lighter colors, such as the yellow, go on really well, and if they get a little thin on some of the ridges, it just helps us see the highlights a little better when we get to that stage.
There are a few tricky angles, such as the part of the caparison obscured by the shield, but try your best, and get as much as you can.

After that, it's time for the armor. Use your gunmetal grey to paint Gregor's armor and the banding and back of the shield. You also want to paint the hilt and pommel of his swords before moving onto the horse's armor.

Go slowly, and try your best not to get any gunmetal onto the yellow, as I said previously, because it will be a PAIN to touch up.

Now, mix up your 50/50 black/white mix and using one of your smaller brushes, start painting all of the black detail. I started with the hounds on the shield, and if you turn your brush parallel to the hounds, you can catch the paint on their raised detail, similar to how I describe how to paint eyebrows in my Greatjon Umber tutorial.

You'll also need to do the same thing for the hounds on Gregor's chest. Paint the hounds, his belt, gloves, saddle, and reins before you paint the horse's hooves and tail. I also painted the tiny rock that is connected to the horse's caparison on the horse's lefthand side this color as well, however, you can paint it any color you like.

Now, using the plate mail metal, we paint the blade of the sword, the stirrups, and the metal portions of the bridle, such as the rings on the snout and the bit.
The plate mail metal is ever so slightly lighter than the gunmetal grey, and should provide a nice, but subtle, contrast between the metallics.

The final thing you'll basecoat will be the handle of the sword with a little bit of flat earth, or whatever basic brown you're using. It's not that important of a step, and it could really be whatever color you choose.
Once that's all dry, it's time to shade!
3. Shading
We will be using three different shades for Ser Gregor today:

Soft Tone, Dark Tone, and Strong Tone, all by The Army Painter.

Starting off, we'll be using our Strong Tone on the horse itself. This means all of the exposed portions, such as the ears, muzzle, legs, tail, etc. Try to avoid any of the yellow caparison if you can, however, if you get some on the armor, it's not a big deal.
Now, you'll be using Soft Tone to do the lion's share of the work.

Apply the Soft Tone to all the yellow portions. Gregor's tunic, the cloak, the caparison, even the shield. It's best to go section by section instead of jumping around between the different parts. Do the cloak, then the right arm, then the left arm, etc.
Your washes not only add depth, but they serve as a way to unify the entire paint job, and it's not unifying if there are a bunch of splotches all over the place.
Don't feel that you have to apply a lot, either. Just enough to add a little brown tint to the yellow, but not too much that the yellow becomes brown or orange.

Now, using your Dark Tone, you'll shade all the armor, his gloves, stirrups, saddle, the black reins, and the sword. This includes the metallic portions of the shield as well.
Be careful when working on the banding of the shield, as you don't want the dark tone to get on the yellow field of the shield. Don't be afraid to use your detail brush to apply the wash in certain tricky areas.
Once that's all done and dry, it's time to highlight!
4. Highlights and Finishing Touches
So, really, there aren't that many different highlights to do, but what there is, there's a lot of, due to the sheer enormity of the figure. We're going to start with the big, yellow, elephant in the room, incidentally, using the same yellow as before.

The best way to see where to apply the highlights is to look at The Mountain from a bird's eye view. All of the folds in his cloak that billow upwards and the tops of his sleeves are all areas that you should highlight, while trying to avoid the areas that have been darkened by the wash.
When you view the model from the left, you can see a similar idea. Highlighting the portions of the caparison that billow outwards, while leaving the darkened recesses as they are. Note that you don't actually have to highlight the yellow of the shield. The wash and the curved nature of it do most of the work for you.

On the Mountain's right, you can see a similar idea with the caparison, however, there are also portions of Clegane's tabard and tunic that need to be highlighted, such as the folds near the belt and armpit, along with the portion that is bunched up on his saddle behind him. Again, highlight the portions that are outward and upward, leaving the recesses darkened.

Now, we move onto the horse's highlights. Using your flat earth, start off by highlighting the back of the horse's ears. Just a little line from the base to the tip should do.

After the ears, we move onto the legs. Just adding a little bit of the flat earth to the front of the knee and shin on the front two legs give the creature a real sense of depth and dimension. Similar to the ears, usually just painting down the front of the leg to the shin will be enough to look good.
You can also take this time to highlight the nostrils and the lips of the horse if you like, though it's not a necessity.

Next, comes the black portions. Mix up your 50/50 black/white mix, but add just another drop of white into it, so it's 1 part black and 2 parts white. This should give us a SLIGHTLY lighter color. If it's too light, you'll want to balance it back out by adding some more black.
But using your detail brush, you're going to apply this as a highlight to the top of the reins, belt, and hounds of Ser Gregor. Just draw a small line across the top of the feature you're highlighting, and that should be enough to make the highlights pop.
The shield should end up looking similar to this:

It's a very subtle highlight, but it works really well.
You could also apply this highlight to the gloves if you choose, simply look at The Mountain from a bird's eye view again, and paint the glove accordingly.

The last highlight that we're going to do is actually going to be the easiest. We're going to take a little bit of this new black and white mix and drybrush it onto the tail of the horse. Make sure that there's barely any paint on your wedge or chisel brush as you do this, and don't worry about getting full coverage of the tail, just the top, back, and sides.
5. Decapitate Some Horses!

That's it, y'all! Base Ser Gregor, spray him with your matte spray, and this mounted behemoth is ready to run through the battlefield solo!
This, along with all my other tutorials for A Song of Ice & Fire, can be found on my blog here, and as always, if you've found this tutorial useful, please consider becoming a Patron. Every dollar helps me to provide you with quality, weekly content, and brings me closer to being able to provide it ad-free!
Comments
Post a Comment