Become a Patron!


 |
| by CMON Games |
"If There's Honor in Him, He Hides it Down Beneath His Suit of Bones..."
Oh, Rattleshirt. Such a cool name, even though I think people are trying to make fun of you when they call you that...
As you guessed it, folks, today, we're talking about the Lord of Bones.

This new Free Folk Commander option is part of the Free Folk Hero Box, and is another great option for starting your miniatures painting journey. Well, let's get to it!
1. Gameplan, Prep, and Prime
Okay, so everyone knows that I base all of my color palettes off of the HBO series, and good ol' Rattleshirt is no different.

So, here's a picture of his short lived live action performance, and here's his appearance from the amazing card art:

As you can see, they're essentially identical. Here are the colors that I've assembled to help replicate this look.

Vallejo
Handmade Modern
Elephant (light grey)
Ceramcoat
White
Not too hard, only a handful of colors.

As you can see, I've already primed Rattleshirt with my airbrush and Stynylrez Grey Primer. I'll be honest, the grey primer will be doing most of the heavy lifting for you. Once that's all dry, it's time to start basecoats!
2. Basecoats
We're going to start with a drybrush using your light grey.

Just do a nice even drybrush all over the whole figure with your light grey. You can see, it's already starting to pick up a significant amount of the details.

Next, you'll get some of your white paint and drybrush some of that over the upper half of Rattleshirt. You should start to notice that the details are really starting to pop.
Once that's done, you should take some of your basic skin tone and paint the small portion of Rattleshirt's chin that's sticking out from beneath his skull mask.
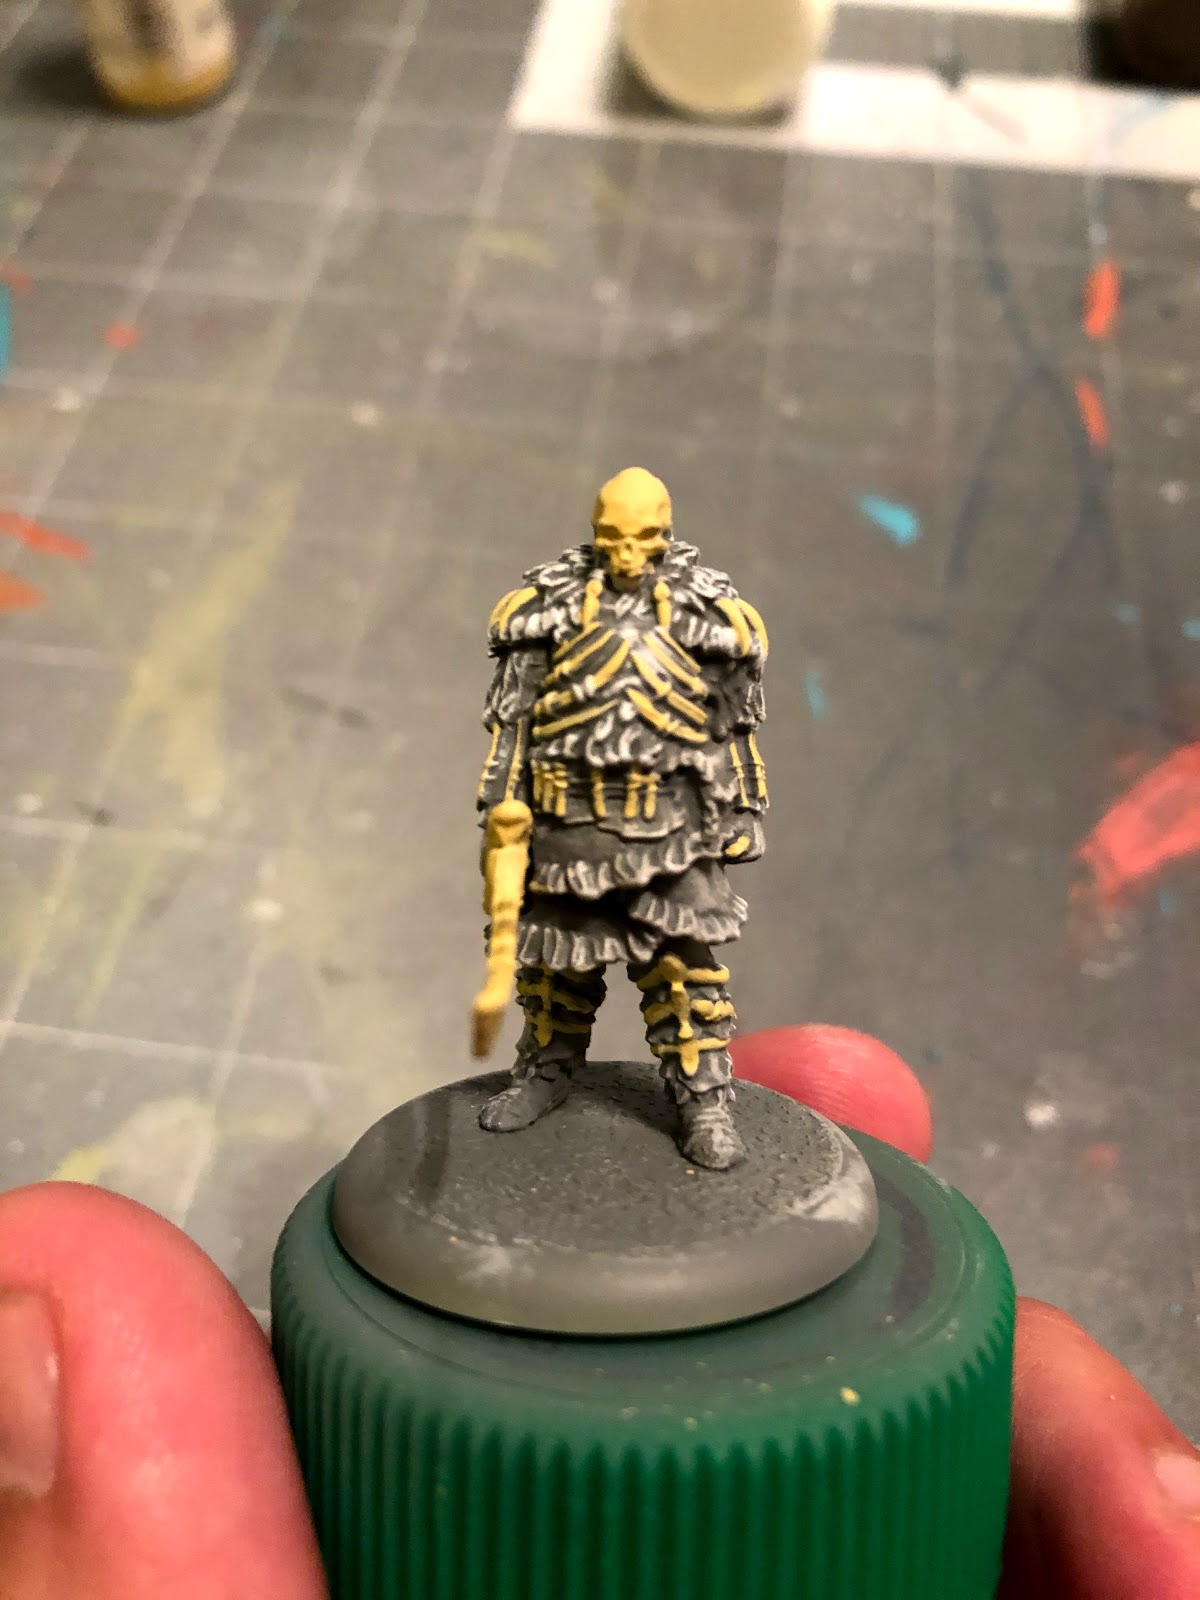
After that, dilute some of your dark sand with equal parts water and paint all of the bones. I'll be honest, this this part is difficult. Use your smallest detail brush and paint all of the various rib cages on his shins, his ACTUAL chest, and the other various bones adorning his clothing, not to mention his BIG ASS BONE SWORD.
This color is a little light, so you'll probably what to apply two coats of this color, just make sure that you wait for the first coat to completely dry before you apply a second.

Here's an example of what the back of the figure should look like, including the spine and some of the bones on the shoulders.

The last little thing you'll want to paint will be the pouch on Rattleshirt's hip and the belt using your chocolate brown. After that's dry, it's time for shades!
3. Shading
Keeping it simple today.

I specifically am using nuln oil instead of dark tone by Army Painter because nuln oil doesn't tint the basecoats nearly as much as dark tone does.

Start with your soft tone and apply a thin layer to the skull, bone sword, and the spine. Just a thin layer to deepen the details, but try not to let it pool up too much, especially on the bone sword.

After that, apply a thin layer of nuln oil over everything else. Again, don't let it pool up too much in any particular area, and try to go section by section ie. first the shoulders, then the arms, then the legs, etc. This way the wash application will be even, and reduce the chances of it being splotchy.
Once that's all dry, it's time for highlights!
4. Highlights and Finishing Touches
Okay, so most of the highlights are already done for us through our drybrush step in the very beginning, so we'll really just be highlighting the bones and what little skin that's showing.

Taking your basic skin tone, start off by painting a little dot on the chin. Just right in the center to give it a little pop.

After that, paint the skull's forehead, eye brow areas, cheekbones, and the bones around his nasal cavity with your dark sand to give the skull a pop.
For all the other bones, try to paint a highlight along the top of each bone, or down the very center of it for the ones hanging vertically.

You'll also apply a highlight to each ridge on the spine, as pictured above, and you can apply an edge highlight to the bone dagger by painting each of the, well, edges with dark sand as well.

Then, take some of your flat earth and paint a line across the very top of the satchel on his hip.

The last thing you'll be highlighting will be the edges of his fur. Taking some of your white, just paint the very edges of all the fur that's coming off of his clothing, just in order to give it a little bit more pop. Like I said previously, most of the work is already done for you, but here, we're just reinforcing those colors to make the figure as dynamic as possible.
5. Gather Trophies from the Fallen!

That's it, Westerosi! Base him however you like and get him on the battlefield, leading some of his chosen!
Again, as a reminder, this along with all of my painting tutorials for A Song of Ice and Fire can be found on my blog, and if you found these, or any of my tutorials useful, please consider becoming a Patron. Every dollar helps me bring quality content to you on a regular basis.
Comments
Post a Comment