Become a Patron!


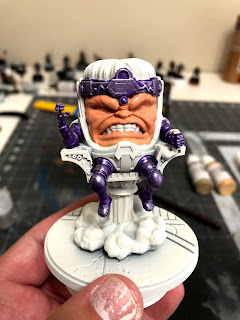
The first thing we'll be doing will be using some of our purple people eater from Turbo Dork to paint the metallic purple portions of the model, including his arms, legs, and crown.
This color can be difficult to use over a white basecoat, so use it straight from the bottle, and don't be afraid to apply two coats, as that's what you're seeing here, just wait for the first coat to completely dry before you apply the second.

Once that's all dry, take your necron compound and give all of the purple portions a good drybrush. You'll see this already starts to give a little bit of depth and highlights to the metallic portions of the model.
After that, take your barbarian flesh, thinned with equal parts water, and paint the skin. Don't worry about painting over the eyes or teeth, as we'll be repainting those later anyway.
Again, you may want to apply two coats of this color just to get even coverage.

Next, take your flat earth and paint the hair. Nothing too fancy here, just thin it with equal parts water and give it a decent coat.

After that, we'll be painting the chassis/chair/armor. Take your gold and apply it straight to the model with no water. Just like the purple people eater, this metallic can be a little difficult to apply to a white undercoat, so I applied 2 coats, again, remembering to let the first dry completely before applying the second.
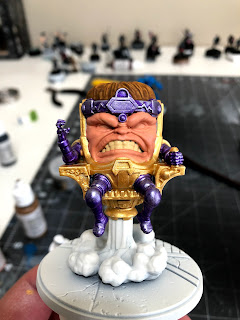
Now that the metallics are painted, thin your dark sand with equal parts water and paint the teeth. If you get some on the skin, don't be afraid to repaint the lips with your barbarian flesh.

The final thing we'll be basecoating will be the eyes. Take your white and just paint in the eyes with your detail brush.
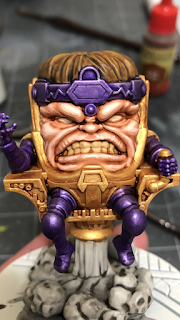
Once it's all dry, it's time for shades!


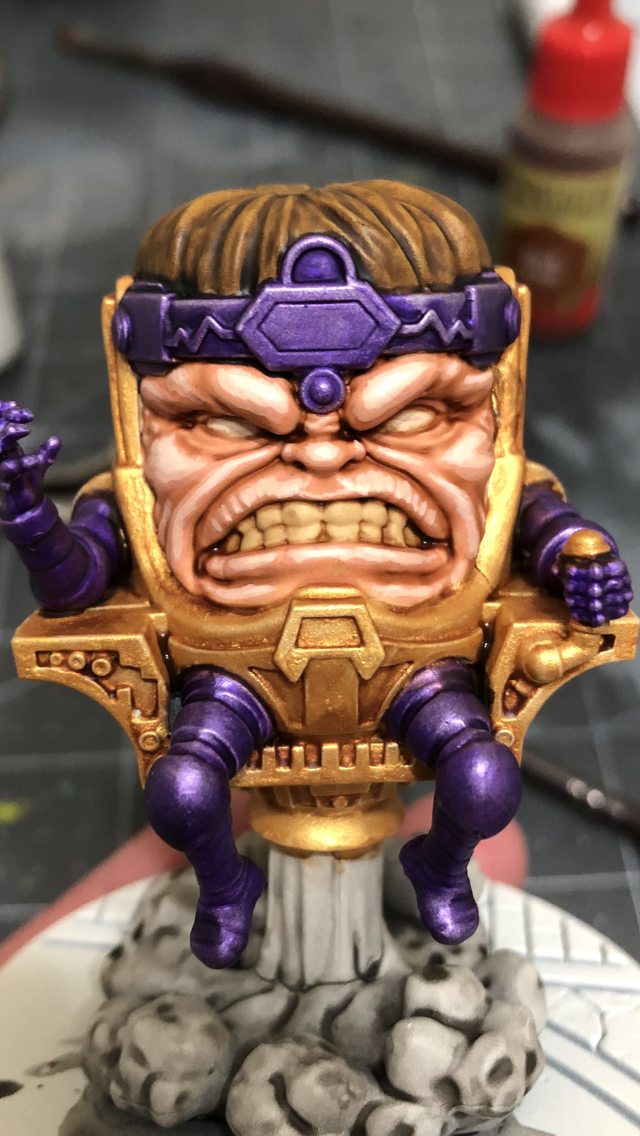
After that, take your dark sand and give the center portion of the hair a drybrush as well, creating a gradient highlight that gets brighter as the hair gets closer to the center of his head.

Since you've got your dark sand out, take the time to highlight his teeth by painting the center of each tooth, avoiding the gaps and portions that are darkened most by the wash.

Now take your white and highlight the eyes by repainting the center of each. You can also take this time to add a small dab of white on each tooth to give it a glistening look, while still maintaining the dingy dirty color.

Since you have your white available, you can paint the two lights on his crown white at this point. We'll be coloring them in later, but for now, we want a clean slate.

Taking your transparent yellow, transparent orange, and transparent red, you'll want to apply those colors directly to the exhaust, going from yellow to orange to red. Try to apply each new color while the previous is still wet as it helps with the transition.

Now take one drop of transparent red and add about 15 parts of water to thin it before painting the lights on the crown. Starting on the outside of each, you'll want to add multiple layers of the mix, again, waiting until the previous is dry, to achieve the desired intensity of color.
You can also add a single layer to the tops of his eyebrows if you want to give a little radiant glow effect to the lights.
I'm also going to apply a thin layer of this color past the red portion on the exhaust, going all the way down to the plume.

Once all of that's dry, take your white again and apply a good drybrush all over the exhaust and smoke. If you need, you can even go in and paint each individual stream of exhaust as it comes out of the chair to give it a solid white color.
You can also take this time to paint the centers of each of the lights in his crown with a tiny portion of white.

As an optional step, you can use your german grey to paint the interior of his voicebox, and freehand a small wavelength design over the field of grey with your detail brush and the emerald color.
A final optional touch you could add is to use a little more drybrushed necron compound to some choice purple metallic portions, like the knees, fingers, or toes, but that's up to you.

 |
| by Atomic Mass Games |
Mental Organism Designed Only for Killing...
Welcome back, True Believers! Today we're taking a look at quite possibly the oddest character in the Marvel Universe, and that's saying quite a bit, the T-Rex of Marvel: Crisis Protocol. Today, we're talking about M.O.D.O.K.

I'll be honest, I wasn't planning on even BUYING M.O.D.O.K. in the first place, but MAN, I am so glad that I did.
Let's get to it.
1. Gameplan, Prep, and Prime
Just like all the rest of the Crisis Protocol line up, Atomic Mass Games has a great picture of them on their website, so don't be afraid to head over there for reference.

I'm just going to be sticking pretty close to the box art, and here are the paints that I'll be using to help.

Citadel
Turbo Dork
Vallejo
Gold, Basic Skin Tone, Light Flesh, Flat Earth, Cork Brown, Dark Sand, Transparent Orange, Transparent Yellow, Transparent Red, Emerald (not pictured above), and German Grey (not pictured above)
Army Painter
There's a lot to unpack up there, especially since you might spot that I put some Old Gold by Vallejo up there, but I ended up not using any. Trust me, It'll be worth it to gather these paints, or at least reasonable facimiles.
I ended up priming the figure with some white spray on primer by Citadel, just so the colors would have a little more of a pop.
2. Basecoats

The first thing we'll be doing will be using some of our purple people eater from Turbo Dork to paint the metallic purple portions of the model, including his arms, legs, and crown.
This color can be difficult to use over a white basecoat, so use it straight from the bottle, and don't be afraid to apply two coats, as that's what you're seeing here, just wait for the first coat to completely dry before you apply the second.

Once that's all dry, take your necron compound and give all of the purple portions a good drybrush. You'll see this already starts to give a little bit of depth and highlights to the metallic portions of the model.

After that, take your barbarian flesh, thinned with equal parts water, and paint the skin. Don't worry about painting over the eyes or teeth, as we'll be repainting those later anyway.
Again, you may want to apply two coats of this color just to get even coverage.

Next, take your flat earth and paint the hair. Nothing too fancy here, just thin it with equal parts water and give it a decent coat.

After that, we'll be painting the chassis/chair/armor. Take your gold and apply it straight to the model with no water. Just like the purple people eater, this metallic can be a little difficult to apply to a white undercoat, so I applied 2 coats, again, remembering to let the first dry completely before applying the second.

Now that the metallics are painted, thin your dark sand with equal parts water and paint the teeth. If you get some on the skin, don't be afraid to repaint the lips with your barbarian flesh.

The final thing we'll be basecoating will be the eyes. Take your white and just paint in the eyes with your detail brush.
Once it's all dry, it's time for shades!
3. Shading
There are a few different washes we'll be using today:

Flesh Wash, Purple Tone, and Light Tone by The Army Painter, and Nuln Oil by Citadel, though you could easily substitute Dark Tone for the Nuln Oil.

The first thing we'll be doing is adding some purple tone to all of the metallic purple portions. Let this dry COMPLETELY before moving onto the next washes because you don't want the purple to run into the gold or flesh colored portions of the model.

Next, you'll apply the flesh wash to the skin, teeth, and eyes. Just a thin layer over this section of the model is enough to give depth, but try not to let it pool too much in the corner of his mouth.

After that, finish the model off with some light tone on the gold and some nuln oil on the hair and exhaust. For the exhaust, try not to let it pool up by the plumes of smoke, and if it does, soak it up with a dry brush, leaving just a thin layer.
Once it's all dry, and that can take awhile, it's time for highlights.
4. Highlights and Finishing Touches
Due to the nature of this character, we'll be spending a bit of time on his face and skin.

Start off by highlighting his face with the barbarian flesh, following the green pattern above.

Once that's dry, mix together one part barbarian flesh and one part basic skin tone and apply that mix the previously highlighted portions, following the yellow pattern shown above. Notice how there is still significant portions of green that is showing beneath the yellow, as should the first layer of highlight with the most recent layer.

Finish off the face by adding a little light flesh to your skin highlight mix and following the white portions colored in above. Just a few small details here and there including the tip of the nose, portions of the cheek closest to the eyes, the highest points of the eyebrows, and some of the lips and nasolabial folds.
By the end, you should have something that looks a little like this.

Next, take your cork brown and give the hair a good drybrush from the top, going against the grain.

After that, take your dark sand and give the center portion of the hair a drybrush as well, creating a gradient highlight that gets brighter as the hair gets closer to the center of his head.

Since you've got your dark sand out, take the time to highlight his teeth by painting the center of each tooth, avoiding the gaps and portions that are darkened most by the wash.

Now take your white and highlight the eyes by repainting the center of each. You can also take this time to add a small dab of white on each tooth to give it a glistening look, while still maintaining the dingy dirty color.

Since you have your white available, you can paint the two lights on his crown white at this point. We'll be coloring them in later, but for now, we want a clean slate.

Taking your transparent yellow, transparent orange, and transparent red, you'll want to apply those colors directly to the exhaust, going from yellow to orange to red. Try to apply each new color while the previous is still wet as it helps with the transition.

Now take one drop of transparent red and add about 15 parts of water to thin it before painting the lights on the crown. Starting on the outside of each, you'll want to add multiple layers of the mix, again, waiting until the previous is dry, to achieve the desired intensity of color.
You can also add a single layer to the tops of his eyebrows if you want to give a little radiant glow effect to the lights.
I'm also going to apply a thin layer of this color past the red portion on the exhaust, going all the way down to the plume.

Once all of that's dry, take your white again and apply a good drybrush all over the exhaust and smoke. If you need, you can even go in and paint each individual stream of exhaust as it comes out of the chair to give it a solid white color.
You can also take this time to paint the centers of each of the lights in his crown with a tiny portion of white.

As an optional step, you can use your german grey to paint the interior of his voicebox, and freehand a small wavelength design over the field of grey with your detail brush and the emerald color.
A final optional touch you could add is to use a little more drybrushed necron compound to some choice purple metallic portions, like the knees, fingers, or toes, but that's up to you.
5. Spin That Doomsday Chair!

That's it, True Believers! Spray him with your matt spray and get him on the table!
Hopefully this tutorial was helpful to you, and if you you need to come back for reference, you can always find this, and all of my Marvel: Crisis Protocol tutorials here on my blog, and if you want to see more content like this, I humbly ask that you consider becoming a Patron. It's only $1 a month, and every bit of it goes to helping me create the best content possible.
That looks really awesome Mike
ReplyDeleteThanks! I really wanted to show off the skin and the face since so much of the model is FACE.
Delete