Become a Patron!


 |
| by CMON Games |
"It's Dangerous Being Free, but Most Come to Like the Taste o' It..."
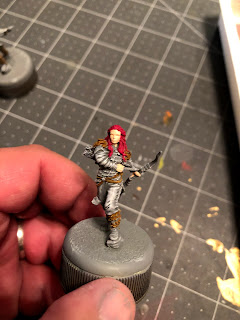
Oh, man, we are talking about my Game of Thrones Waifu today. She's smart, she's brave, she's fierce, and she'll slit your throat while you sleep if you treat her badly. Today, we're talking about the love of Jon Snow's life, Ygritte.

In spite of the amazing detail found on this mini, she's actually a remarkably simple paint job, and would be a good model for you to start on if you're interested in getting into the hobby of miniature painting. Let's dive in.
1. Gameplan, Prep, and Prime
So, y'all know I love to base my paint jobs on the character's appearance on the HBO series, and Ygritte is no different.

Portrayed by the lovely Rose Leslie, Ygritte made an immediate impression and delivered an early series ship we were all aboard. So, to replicate her snowy leathers and furs from the show, I've assembled these paints:

Vallejo
Red, Bright Orange, Flat Earth, Dark Sand, Basic Skin Tone
Citadel
Wild Rider Red
Army Painter
Plate Mail Metal
Ceramcoat
White
Handmade Modern
Elephant (light grey)
In the picture above, you'll also notice some light flesh by Vallejo, but I ended up not using it.
Most of these colors are going to be for the hair, so don't worry, you're not going to be using them all the time.

I've gone ahead and primed the model with Stynylrez Gray Primer and my Badger Airbrush, though if you want to simply prime in white and then apply a basecoat of gray, that would work just as well.
2. Basecoats

Okay, so the first thing you're going to be doing is taking some of your light gray and doing a drybrush with it all over the model. This is the exact same technique we used when painting the Sworn Brothers and the Veterans.

Once we're done with that, we're going to take our white and do an additional drybrush over the top portions of the mini, the arms, the left thigh and knee, pretty much any place that would catch the sunlight.

After that, you'll want to make sure that you thin all of the rest of your basecoat paints with equal parts water, and use your basic skin tone to paint the face and hands. You'll probably still want to apply multiple coats of this, since it is a lighter tone, but make sure that you wait for the first coat to dry before you apply a second.
Next, take your flat earth and paint the fur around her shoulders, her belts, her quiver on her right hip, and the tufts of fur around her calves and shins. Nothing too fancy here, but make sure that you go slowly and try to avoid getting any brown on her suit itself.

Then, you'll take your red and paint her hair. So, this is a little hard because it's very difficult to tell where her hair ends and the fur around her shoulders starts. Try to follow the locks of hair as they fall, but don't worry if your hair intermingles with the fur. I have a feeling everyone's Ygritte hair will be different.

From here, use your dark sand to paint the bow and arrows, including those still in her quiver on her hip. Again, you might want to apply two basecoats since it's a lighter color. Don't worry too much about trying to avoid the feathers on the arrows or the leather wrap on the bow itself, we're just going to be painting over those.

Now, use a little bit of your white and paint the feathers of the arrows. You don't have to be that careful with the technique here, you can even do it almost like a drybrush, but with a traditional paint brush. You can also use this time to paint the arrowhead and beltbuckle with your plate mail metal.

The final thing we'll be doing is painting the leather straps of the bow, using your flat earth. Do your best to try to leave a few of the spaces in between the leather straps showing the lighter dark sand color to help with the detailing.
3. Shading
Once that's all dry, it's time for some shading:

Flesh Wash, Strong Tone, Soft Tone, and Red Tone all by The Army Painter.

We're starting off with the flesh wash, like I always do, and applying a thin coat of it to the face and hands. Don't worry if it gets on the hair or clothing or bow, it's easily covered.

Next, take your red tone and apply it to the hair. This one you'll want to be a little more careful with because you don't want to get any red on her clothing, so don't be afraid to use a small brush to apply the wash.

After that, use your soft tone and paint the bow and arrows. I even used this for the arrowhead and feathers, but you can use a dark tone/nuln oil if you want to get a cleaner, purer metal/white look.

The next part is actually pretty much voluntary in regards to her clothing. I used strong tone to wash her clothing, to give her that dirty look, though you can ABSOLUTELY not do this and she'll have a more gray and white look, but I felt this was a good way to get some of that dirty, leathery look to her clothes.
Regardless of what you choose, you'll want to make sure that you also wash the fur, belts, and quiver with strong tone as well.
Once your washes are all dry, it's time for highlights!
4. Highlights and Finishing Touches

For the highlights, we'll again be starting with the face and skin. Using your basic skin tone, highlight the forehead, cheekbones, nose, and chin of Ygritte's face, along with the index finger and thumb on each hand. You can also try to get the individual knuckles for each finger as well, though that is not as important.

Then you'll take your dark sand and highlight the back of the bow, and the arrows. You can also take this time to color the small ropes holding the quiver together this color as well.

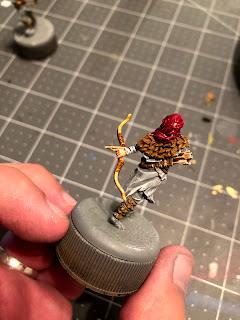
After that, we're pretty much just going to be working on the hair. Using your wild rider red, you'll be applying a highlight to all of the locks of her hair.

Here's an example of how to highlight the back of her head. Just pick out the most prominent locks of hair and apply a small highlight to them.

Once you've done that, we're actually going to be adding a second level of highlights with our bright orange. I started off by doing some top down highlights, painting only about half of what I had just painted with the wild rider red.

Here's an idea of what that might look like from the front...

And here's the rear of the model.
At this point, you could take some of your wild rider red or your bright orange and paint the lips and eyebrows respectively. You can also take this time to use your white and highlight the tips of the arrows in Ygritte's quiver...

Then you'll take your dark sand and highlight the back of the bow, and the arrows. You can also take this time to color the small ropes holding the quiver together this color as well.

After that, we're pretty much just going to be working on the hair. Using your wild rider red, you'll be applying a highlight to all of the locks of her hair.

Here's an example of how to highlight the back of her head. Just pick out the most prominent locks of hair and apply a small highlight to them.

Once you've done that, we're actually going to be adding a second level of highlights with our bright orange. I started off by doing some top down highlights, painting only about half of what I had just painted with the wild rider red.

Here's an idea of what that might look like from the front...

And here's the rear of the model.
At this point, you could take some of your wild rider red or your bright orange and paint the lips and eyebrows respectively. You can also take this time to use your white and highlight the tips of the arrows in Ygritte's quiver...
5. Tell Jon Snow he Knows Nothing!

That's it! Hit her with some matt spray, base her however you like, and start assassinating those attachments!
Like always, this, along with all of my tutorials for A Song of Ice and Fire can be found on my blog for future reference, and if you like what you see, and would like to help me create more content like this, consider becoming a Patron!
And don't forget to check out my new YouTube Channel, where you'll get cool videos of me painting with guests like the lead developer of A Song of Ice and Fire, Fabio Cury!
Until next time, Westerosi!
Builder Scorpion Crew Unit Box United States Giveaway!
Remember to Share, Comment, and Subscribe!
Love what you've done with the hair, it's not as intrusively bright as many redheaded minis turn out. Keep up the great work!
ReplyDelete