Become a Patron!


As such, I've gathered the following paints, and it's a lot:


 |
| by CMON Games |
"The Young Wolf Remains Unbeaten in the Field..."
So, heads up. I watched Game of Thrones before I read any of George R. R. Martin's books. So that means that when I think of Robb Stark, I think of Richard Madden's star making turn as the character. As such, I'll be doing a tutorial on how to paint Robb Stark akin to his appearance in the HBO series, and that is a STARK (see what I did there) contrast to his appearance in the awesome in-game art.

If that is going to be an issue for you, I'm sorry, but I may do a separate tutorial on his in-game appearance if there's enough call for it.
Now, let's get to it!
1. Gameplan, Prep, and Prime
So, as I said before, when I think of the King in the North, I think of Richard Madden, and I've found this great picture of his Stark armor/outfit to use as a reference.

As such, I've gathered the following paints, and it's a lot:

From Vallejo, I've grabbed Japanese WW 2, Chocolate Brown, Flat Earth, Gunmetal Grey, and Basic Flesh. The Japanese WW 2, Chocolate Brown, and Flat Earth could probably be replaced with tan, dark brown, and standard brown if you want as well. From the craft store, I have black and white, and a standard gray from Target. As well as our MVP from The Army Painter, Plate Mail Metal.

As you can see, I've already primed Robb with The Army Painter's Matt White spray primer, and we're ready to start painting!
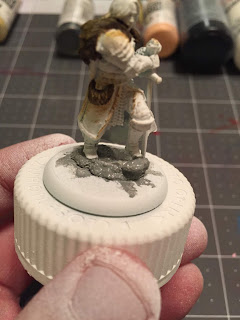
2. The Fur
Similar to what we did when we were painting Greatjon Umber, we will be starting with the fur. Start off with a nice coat of chocolate brown, thinned 50/50 with water.

Once that is dry, you'll be drybrushing on the flat earth over that, and remember, whenever we drybrush, we don't thin our paints.

One last drybrushing of the Japanese WW 2 over that, really focusing on the top portions of the fur.

Make sure that you do this process on the tail (?) that curves around Robb's hip, and you'll notice that we've already created some good highlights, but we've made a mess of the surrounding areas, which is why we're doing this part before we apply our basecoats.
3. Basecoats
As an FYI, all of your basecoats here will be thinned 50/50 with water, so I just wanted to get that out there.
Once again, I learned my lesson from painting Greatjon, so we will be starting with the ROCK that Robb is standing on.

You don't have to have the best coverage on this, or the most even coat, honestly, because at the end of the day, if everyone's just looking at the rock he's standing on, we've got bigger problems.

Then move onto the cloak. This is the same 50/50 white/black mix that we've been using for both The Mountain and Greatjon Umber, so you should be pretty familiar with it. Once that is finished, move onto the tunic/tabard.

You'll want to use your flat earth or standard brown here. Bear in mind there are a lot of hard angles with this mini, so be patient, and try to get as much as you can. Especially be careful of sections of his tunic that are near his undercarriage, near the back. You don't want random unpainted portions of your mini.

Next you'll be using the gunmetal grey to paint all the armor and the hilt of the sword. This includes the spaulders (upper arm), elbow, bracers, gorget (upper chest/neck) and grieves (shins). Don't forget the portion of chainmail between his legs, either.

Now, we can finally give this poor man some color on his face using basic flesh. If you get any on the fur, like I did, don't be afraid to use your detail brush to reapply some chocolate brown.

Speaking of chocolate brown, use that to paint the hair and the exposed left thigh and knee. You'll also want to try to get some of the right thigh that you can see behind the chainmail. And if you're REALLY crazy:

You can use your detail brush to give Robb a little beard, just like Richard Madden has in the series, however, this is COMPLETELY OPTIONAL. (If I'm being completely honest, it kind of makes him look like John Krasinski from A Quiet Place...)

Once you're done with chocolate brown, you'll want to add some top down highlights to Robb's hair with flat earth, and once that is dry, you'll do the same thing with Japanese WW2.

When applying the Japanese WW2, make sure you cover less area than you did with the flat earth, as we want three distinct colors in the hair. This will make the hair look more natural when we put our wash on it.

Next, move onto the boots, gloves, and belts. This is just more of the 50/50 black/white mix. And when you're done with that, use plate mail metal to paint the blade of the sword, and all of the metal studs on the belts and trim of the tunic.

I also chose to apply the plate mail to the chains at the front of the gorget, just to make them stand out, but you don't have to.
Now, we're ready for some shade!
4. Shading
Here are the 3 washes I'll be using to throw shade at the King in the North (more like the King who Lost the North!)

Red Tone, Flesh Wash, and Dark Tone, all by The Army Painter.
First we'll start by applying red tone to the hair.

This will give us that red tint to the dark hair that the character has in the HBO series. Note that you may have to apply 2 or 3 times to get the intensity of red that you are looking for. I stopped at 2 myself.

Next, apply some flesh wash to the face. You don't have to be careful with the beard either, if you chose to add one.

And finally, you'll apply the dark tone EVERYWHERE else. Don't let it pool up too much in any one place, but you want it to get into all the little nooks and crannies on the tunic, the fur, the armor, everything. Even the rock. Once that's dry, it's time for highlights.
5. Highlights and Finishing Touches

The first thing we should do is highlight the face. Just take your basic flesh and paint the forehead, cheekbones, and nose. Avoid the areas darkened by the flesh wash, such as the hair line, the folds between the cheeks and nose, and the eye sockets.

Now, you'll highlight the tunic using the flat earth. Any of the folds, or areas that are lighter than because the dark tone didn't settle there. Try to just hit the lighter areas on both sides of the tunic.

Once that's dry, mix in some of the Japanese WW2 into your flat earth. It should be a 1/1 thinned with equal parts water, and you'll just be applying this to the center of the highlights you just did, in order to really make them pop and give them depth.

You'll want to be VERY careful adding the highlights to the left side of the tunic, as well, as the room for your brush is very TIGHT and you don't want to get your tan/brown highlight mix anywhere it shouldn't be.

You'll also use this mix to highlight the padding on the thigh. Just try use your detail brush and try to dab a little onto each diamond on the very top. It should be more than enough to show the pattern, and if you make a mistake, you can always apply more dark tone to the area to cover it up.

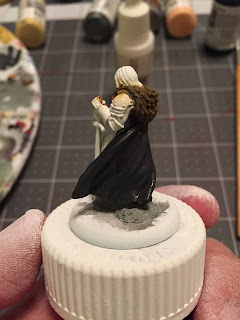
Moving onto the cloak, simply apply the 50/50 black/white mix to the portions of the cloak that are billowing out, the individual fingers on the gloves, and the toes of the boots. Again, this effect will be subtle, but effective.
The last thing you'll be highlighting is the rock. Using a light gray or white, you can drybrush the rock to give it some pop.

You can also take this time to add eyebrows using the chocolate brown, or using any kind of orange-brown to dot in the beard in order to give it more layers.
6. THE KING IN THE NORTH!

Again, spray him with your matt spray, base him however you like, and you're done!
Congratulations! If you've been following along with me, you'll have finished all of the Commanders in the A Song of Ice & Fire Miniatures Game Starter Set!
Comments
Post a Comment