Become a Patron!


Start with the Flesh Wash, and use your detail brush to apply it, as you'll want to be as accurate as possible, especially when you get to the fingers. Then apply the Soft Tone, which is essentially a brown wash, using a larger brush for the tunic and scales, but using your detail brush for the hair.


Now, there's just one last highlight, but it's a big one: THE CAPE!
Normally, I would not thin paint for highlights, but because white is a tricky color, it's better to add multiple coats than to have streaks. Once again, apply highlights from the top down, slowly bringing the dingy gray cape back up to fabulous white.

Remember, just paint what you can see, avoiding the darkest areas before turning the mini to the side and pulling the color down into the darker areas on the side of his cape to create a nice gradual transition from light to dark.


 |
| by CMON Games |
In the Game of Minis, You Either Paint or You Die...
So, today on Painting Poorly I'm going to be looking at painting miniatures from the newest release from CMON, A Song of Ice & Fire Tabletop Miniatures Game.
There are a variety of different figures for you to choose from, but I'm going to be working on one of the simpler figures to paint, but one that will impress your friends when you're finished: Jaime Lannister, the Kingslayer.

A reminder, Painting Poorly is called such for a reason. It is for beginner painters, and for painters that don't want to spend a TON of money. So, if you're looking to paint the 100+ figures that come with the game on the cheap, you're in the right place! So, let's get to it...
1. Gameplan, Prep, and Prime
This may upset some people, but I am a late adopter to the world of Westeros. I was only introduced to the tale through the HBO series, and as such, when I think of Jaime Lannister, I think of this man:

For better or worse, this look will be what I'm basing my paint scheme for my figure on, and as such, I've gathered the following paints:

From the craft store/Target, I got a dark red, light tan, white, and yellow. These were all anywhere from $1 to $2, and they've got a ton of paint. In terms of the metallics, I'll be using Gold and Brass, both from Vallejo. I think it is worth the money to spring for the Vallejo Metallics 8 Pack. It's roughly $20 on Amazon right now, which comes out to about $2.50 a bottle, but they're a great variety of colors and they last. You will also notice some Plate Mail Metal by The Army Painter. That was a little pricier, $3, but worth it, as the one bottle has lasted me over a year, and I'm nowhere near needing to replace it.
My wife also got me the Vallejo Flesh Tone 8 Pack for my birthday, which is about the same price on Amazon as the Vallejo Metallics, so I'll be using Basic Flesh from that, but if you're going on the cheap, "Flesh" craft paint will work just as well. There's also the brown of the scabbard and belt, but any brown should work just fine.
Prime your mini with spray Matt White primer by The Army Painter, which I have previously sung the praises of in a previous installment, and you're ready to start painting.
2. Basecoat
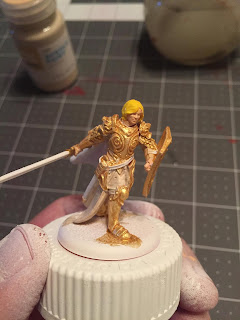
The first thing to start on is the plate armor. The breastplate, the shield, the pauldrons (shoulders), bracers, boots, and tassets (hip armor) will all be covered in gold along with the metal portions of the scabbard.

Gold is a temperamental color, so don't thin the paint too much, or you'll get uneven coverage. As it is, you may need to apply two coats of it, but you'll want to thin with a roughly 2 to 1 paint to water ratio, instead of a 50/50 split like normal.

The scale mail on the upper arms and the hilt of the sword will be painted with brass, which is a slightly stronger color, so a 50/50 paint/water mix will be just fine for that. This gives the scale armor a slightly darker tone, which matches with our gameplan.
Now we can move onto the clothing. Jaime is wearing tan pants and tunic, so we'll be using our tan color on the exposed right thigh/knee and the skirt of the tunic coming out from the beneath the breastplate on both sides.

There are also small sections of his sleeve, between the scale and the bracers, his collar, and his armpits which need to be colored this way as well.

Now basecoat the hair, face and hands using the yellow and flesh respectively, before using the Plate Mail Metal for the blade of the sword and finishing your belt, scabbard, and shield handles with your brown.

We are leaving the cape white, because the capes of the Kingsguard are actually white. Now is the time to touch up any mistakes or missed portions before moving onto the shading step.
3. Shading
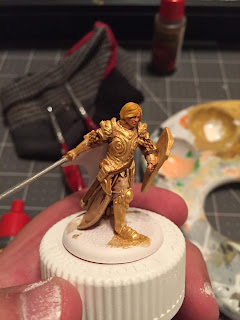
I'm going to be using 3 different colors of wash, all by The Army Painter: Flesh Wash for the face and fingers, Soft Tone for the hair, scales, and tunic, and Dark Tone for all the gold, sword, scabbard, and cape.
Start with the Flesh Wash, and use your detail brush to apply it, as you'll want to be as accurate as possible, especially when you get to the fingers. Then apply the Soft Tone, which is essentially a brown wash, using a larger brush for the tunic and scales, but using your detail brush for the hair.

As you can see, this really mutes the yellow of the hair and gives it a much more natural look, than simply YELLOW.
Now, take your Dark Tone, or black wash, and do everything else. Be careful to work in sections, so that you don't have half of the wash on the breastplate drying faster than the other half, because that can leave marks, and just won't look right.

Again, this mutes the gold, to give a more realistic color.

Save the cape for last, and don't use too much, as you don't necessarily want it pooling in areas, just to give it a little texture. Once that's dry, you're ready for highlights!
4. Highlights
The good news is, you don't need to highlight any of the metallics! YAY! But the bad news is, there's a good amount of other highlighting that needs to happen.
Starting with your unthinned tan paint, you're going to be applying top down highlights as described in Volume 2, to the tunic folds, the exposed knee, and the HAIR! Shocking, I know! Just focus on the top of his head and hit all the ridges of his hair. This will give the hair more natural, muted looking highlights. In terms of the tunic, just focus on the folds, and anywhere it looks like the light would hit naturally.

You'll also want to take your detail brush and unthinned flesh paint to highlight the forehead, nose, and chin on the face, before moving onto the fingers on the right hand, and the thumb and top of hand on the left.

Now, there's just one last highlight, but it's a big one: THE CAPE!
Normally, I would not thin paint for highlights, but because white is a tricky color, it's better to add multiple coats than to have streaks. Once again, apply highlights from the top down, slowly bringing the dingy gray cape back up to fabulous white.

Remember, just paint what you can see, avoiding the darkest areas before turning the mini to the side and pulling the color down into the darker areas on the side of his cape to create a nice gradual transition from light to dark.

That's it for highlighting! I did not highlight the underside of the cape, as it is the UNDERSIDE, so there wouldn't be any light hitting it!
5. Get It On the Battlefield!

That's it, guys! Paint the base however you like and spray it with your matt spray, and Jaime Lannister is ready lead the Lannister forces!
Side Note: I did not describe how to base the mini (terrain, grass, etc.) because I am just learning those techniques myself, and I don't feel confident enough in my skills to teach others. You can find this and all my future A Song of Ice & Fire Tutorials on my blog.
Hopefully this was useful for you! Check back soon as we continue our journeys through Westeros!
Comments
Post a Comment