Become a Patron!


The first highlight we're going to do is take your royal blue and highlight the blue areas of the model. You'll want to hit all of the muscles that bulge out, while avoiding the recesses, where the wash darkened the color most. The areas I've colored green in the above image gives you an idea of where to highlight the front.

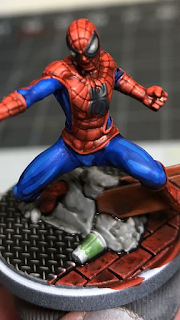
And here's an idea of where you'd highlight the back of the model, which would end up looking something like this.

After that, you'll take some of your blue green and mix it in with your royal blue, in a 1/1 ratio, and add a second layer of highlights to the blue portions.

This lighter highlight, you'll only cover about 50% of what you already highlighted, and the yellow in the picture above should give you a good idea of where to paint on the front...

And here's an idea of what the back would look like, which would result looking something like this:
The next part that we'll be highlighting will be the red portions.

Taking your dark vermilion, paint the center of some select portions of the red portions of his costume. You'll want to paint the pectorals, the abs, the top half of his head, his nose, chin, and fingers. Use your detail brush, and be careful not to get into any of the dark web portions, though, if you do, you can apply some nuln oil to darken them again and start over.

After that, take your wild rider red and make a small dot on all the portions that you had previously painted with the dark vermilion, being careful not to cover up the entirety of the dark vermilion.

After that, you can take some of your white and highlight the eyes back up to bright white by painting the very center of each of his eyes.

 |
| by Atomic Mass Games |
"With Great Power, Comes Great Responsibility..."
Few characters have had as large of a cultural impact as Spider-Man. I don't think it's an exaggeration to say that EVERYONE knows something about him. Try it, I dare you. Find somebody, ANYBODY, whether it's an old lady in a park, or a foreign exchange student from a country you've never heard of. Show them a picture of Spider-Man and I'll bet you that person can tell you AT LEAST that Spidey's real name is Peter Parker and that he was bitten by a radioactive spider.

So, while Spider-Man may be in everyone's collective consciousness, the Marvel: Crisis Protocol model of him can be tricky, due to the webbing on his costume. Fear not, True Believers! Mike Meeple's got you covered!
1. Gameplan, Prep, and Prime
For Pete's color scheme, we're going VERY traditional. Red and blue suit, white eyes.

In order to create this look, I'm going to be using these paints:

Vallejo
Citadel
Handmade Modern
Slate (standard grey)
Ceramcoat
Black, White
Okay, so the first thing we'll need to do is do some gap filling, since my Spidey had some nasty gaps around his hips and shoulders. Just like how I explain in my Hulk tutorial, I just brushed some Liquitex Matte Medium into the gaps and let it dry. You might have to repeat this process for some more severe gaps.

Once the gaps have been filled, you'll want to zenithal highlight your model, as that will do a lot of the detail work for us in regards to the webbing and shading. I used my cheap airbrush and the black, grey, and white Stynylrez primers, and I'm always very happy with the results.
Once that's dry, it's time for basecoats!
2. Basecoats
So, normally, I always tell you to thin your paints with equal parts water, however, we're going to be starting with something that you apply straight from the bottle.

Using your blood angels red, paint all of the red portions of Spidey's costume. You don't want to use too thick of a coat, but enough to get a nice even coverage over all of the painted areas. As you can see, the contrast effects mixed with the zenithal highlight has already given us some fairly dramatic shading in some normally difficult areas to paint.

Now, you'll start thinning your paint with equal amounts of water. Grab your royal blue and paint the portions of Spider-Man that should be blue, ie. his legs, arms, and sides of his torso.

Mix together a 50/50 mix of black and white and grab your detail brush to paint the spider logo on the front, and the outlines of his eyes. This can be very difficult, so make sure you use your smallest brush and take your time. You can also take this time to use your white in order to bring the eyes up to a bright white if you got some of the red on it.

After that, you'll want to take your copper, straight out of the bottle, and paint the I-beam that Spidey's perched on. Nothing too fancy here, just paint on plastic, and you can apply it fairly thick to get an even coverage.

The last thing we'll basecoat will be the rocks/rubble that the I-beam is sticking out of. Again, nothing too difficult here, just use your slate grey to paint over the rocks, and be careful not to get any on Spider-Man himself.
Once that's all dry, it's time for shades!
3. Shading
We're only using two today:

Blue Tone by The Army Painter and Nuln Oil by Citadel, though you could easily swap in Dark Tone by The Army Painter for the Nuln Oil.

We're going to start off with our blue tone and apply int on all of the blue portions of the miniature. Just apply a thin layer and don't let it pool up in one area.

After that, apply some nuln oil to the eyes, just a tiny bit to give depth to the edges, and to rubble and I-beam on the base. Again, nothing too fancy here, just give it a good coat to bring out all the nooks and crannies of the sculpt.
Once it's all dry, it's time to highlight!
4. Highlights and Finishing Touches

The first highlight we're going to do is take your royal blue and highlight the blue areas of the model. You'll want to hit all of the muscles that bulge out, while avoiding the recesses, where the wash darkened the color most. The areas I've colored green in the above image gives you an idea of where to highlight the front.

And here's an idea of where you'd highlight the back of the model, which would end up looking something like this.

After that, you'll take some of your blue green and mix it in with your royal blue, in a 1/1 ratio, and add a second layer of highlights to the blue portions.

This lighter highlight, you'll only cover about 50% of what you already highlighted, and the yellow in the picture above should give you a good idea of where to paint on the front...

And here's an idea of what the back would look like, which would result looking something like this:

The next part that we'll be highlighting will be the red portions.

Taking your dark vermilion, paint the center of some select portions of the red portions of his costume. You'll want to paint the pectorals, the abs, the top half of his head, his nose, chin, and fingers. Use your detail brush, and be careful not to get into any of the dark web portions, though, if you do, you can apply some nuln oil to darken them again and start over.

After that, take your wild rider red and make a small dot on all the portions that you had previously painted with the dark vermilion, being careful not to cover up the entirety of the dark vermilion.

After that, you can take some of your white and highlight the eyes back up to bright white by painting the very center of each of his eyes.
5. Do Whatever a Spider Can!

That's it, guys! Hit him with your matte spray and get out there and make Uncle Ben proud! Hopefully, you guys found this tutorial helpful, and don't forget that you can find this, along with all of my Marvel: Crisis Protocol painting tutorials here on my blog for future reference, and please consider becoming a Patron. Every dollar truly helps and allows me to keep bringing you quality content on a regular basis.
Excelsior!
Excelsior!
Remember to Share, Comment, and Subscribe!
Comments
Post a Comment