Become a Patron!
"Kings Lack the Caution of Common Men..."
Hey there, Westerosi! Today we're looking at one of the NCU's that comes in the Targaryen Starter Set: Illyrio Mopatis.
Okay, so just like my Jorah Mormont tutorial, the Cheeselord is going to take bit of a detour from his card art as we're going to focus on how he looks in the HBO series.
So, in order to recreate this look, I've assembled the following paints:
Vallejo
Dark Sand, Bronze, Chocolate Brown, Flat Earth, Basic Skin Tone, Orange Brown, Bright Orange, Deep Yellow
You'll also see some white in the picture above, but I ended up not using it.
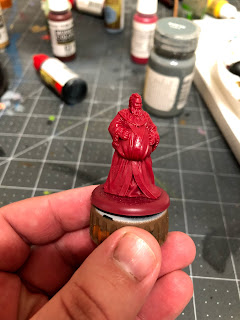
So, I've already applied some zenithal highlights using some Stynylrez primer. Once that's dry, it's time to start with basecoats.
2. Basecoats
Okay, so, here's your friendly reminder to thin your paints with equal parts water unless I tell you to.
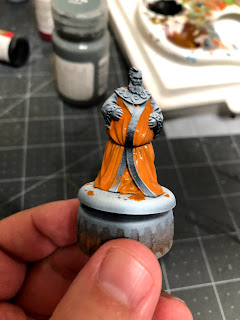
I started off by painting the main portions of his robes with the orange brown. It's a good idea to apply two coats of this color in order to make a smooth application, just remember to let the first coat completely dry before you apply a second.
Next, we'll apply some dark sand to the sleeves. Again, you may want to apply two coats of this color.
After that, we'll be moving onto Illyrio's skin with your basic skin tone. Don't be afraid to paint over the beard as it's easily covered with the color we're going to use for the hair...
Which is coming up next! Using your chocolate brown, paint the beard and hair. For the mustache, do the best you can to paint the curl, but if it comes out looking too straight, you can always repaint the cheek of Illyrio to help add the curl.
The last thing we'll be basecoating will be the metallic trim of the robes. We'll be using the bronze, unthinned, to paint all the accents. You can also use your detail brush to paint a few rings on a few of his fingers to create a small detail.
Once it's all dry, it's time to shade!
3. Shading
So, here are the shades that we'll be using to add a little depth to our Illyrio.
We'll be using Flesh Wash and Soft Tone, both by The Army Painter.
Use the flesh wash on the hands and face and the soft tone everywhere else. Do your best to not let the wash pool up too heavily anywhere, which can happen around the bottom folds of his robes.
Once that's all dry, it's time for highlights!
4. Highlights and Finishing Touches
The first thing we're going to highlight will be the skin. Using your basic skin tone, paint the forehead, nose, and cheeks on the face.
For the hands, normally you'd highlight the knuckles, but in order to give Illyrio's hands a round, soft look, you'll actually highlight the back of the hands themselves, as well as each individual finger.
Next, you'll use your dark sand to paint the highlights of the sleeves. Nothing too fancy here, just apply the paint to all the folds of the sleeve.
After that, you'll use your bright orange to highlight the folds of the robe. Again, just paint the portions of the robe that stick out, leaving the areas that were darkened most by the wash darker.
Here's an idea of where you'd place those highlights on the back of the model.
The next thing you'll do is add some deep yellow to your bright orange and apply a second level of highlight to the most prominent folds in the robes, just to brighten them up, ever so slightly.
The last thing we'll do is use your flat earth to highlight the beard and hair. Just pick and choose some select tufts of hair and apply the flat earth to help make the hair pop.
After that, you can use your chocolate brown to paint his eyebrows and then you should be all set...
5. Make Some Devious Plans!
That's it, guys! Spray him with your matte varnish and get him on the tactics board!
Hopefully you guys have found this tutorial helpful, and don't forget, this, along with all of my A Song of Ice and Fire tutorials can be found on my blog. And if you've ever REALLY found my tutorials helpful, I humbly ask you to consider becoming a Patron. Every dollar helps me to bring quality content to you on a regular basis.


Comments
Post a Comment