Become a Patron!


Here's what we're using today: Flesh Wash, Red Tone, Soft Tone, and Dark Tone, all by The Army Painter.
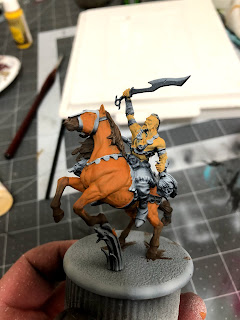
We're going to start on the horse.

Apply the red tone all over the horse, to both the orange sections and the brown sections. Even the mane and the tail.
The horse is large, though, so I recommend you going section by section. Start with the head, then move the right front quarter, then the left front quarter and so on. This will help you applying the shade unevenly or smudging the wash that's already starting to dry.

After that you'll apply the flesh wash to Drogo's skin AND each of the severed heads. Nothing too fancy here, but don't let it go on too thick.

Here you can see how it adds JUST a hint of fleshy coloration to the heads.

After that, apply some soft tone to the dark tan portions, in this case the skirt, "Saddle", along with all fur and the gold. Just a thin coat of wash will help add depth.
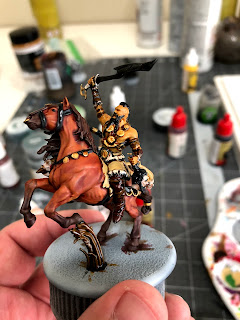
The last wash you'll be applying will be the dark tone, and you'll apply that to the sword blade, all of the straps on the horse, all of the straps on Drogo, along with his pants and bracers.
You can also apply this to his hair if you want it to get really dark.
Once that's all dry, it's time for highlights!


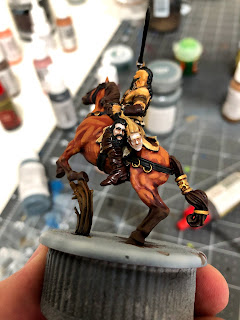


NOTE: Less is always more with gore and blood effects. RESIST the temptation to bathe them in gore. You won't be happy with the results.

 |
| by CMON |
"The Beetles Will Feed On Your Eyes. The Worms Will Crawl Through Your Lungs. The Rain Will Fall On Your Rotting Skin, Until Nothing is Left But Bones..."
Well, well, well... It looks like Targaryen Starter Set has landed, and I am SO STOKED! To kick things off, we're going to start off with one of the most badass characters in the entire A Song of Ice & Fire lexicon, even if his tenure was a bit short lived. We're talking about her Sun and Stars himself, Khal Drogo.

This guy isn't too hard, but he requires a quite a bit of detail work, so get out your smallest brush and make sure it's nice and sharp.
Let's get to it.

This guy isn't too hard, but he requires a quite a bit of detail work, so get out your smallest brush and make sure it's nice and sharp.
Let's get to it.
1. Gameplan, Prep, and Prime
Okay, y'all, I'm basing my paint job off of Jason Mamoa's star making turn in the HBO series:

Wait. Oops... Wrong one...

Nope. Still not right...

There we go...
Here's another shot of him with his war paint.

Between those two images it gives me a pretty great idea of how to proceed, and I've assembled the following paints:

Okay, that's a LOT of paint, but let's break it all down:
Vallejo
German Grey, Gunmetal Grey, Gold, Medium Flesh, Field Blue, Orange Brown, Light Flesh, Basic Skin Tone, Hull Red, Chocolate Brown, Flat Earth, Dark Sand, and White (though it's not pictured above)
Army Painter
Citadel

As you can see, I've gone ahead and applied a zenithal highlight using my airbrush and Stynylrez Primers. While this isn't a necessity, it can help with some of the hard to reach places that you may miss during basecoats.
Once it's all dry, it's time for basecoats.
2. Basecoats
Here is your obligatory reminder to thin your paints with equal parts water unless I tell you otherwise.

We're going to start off with our orange brown and paint our horse. Only paint down to the horse's knees, and ignore the mouth for now.
You may want to apply two coats of paint in order to get a nice even coat.

Next we're going to paint the horse's legs from the knees down with your chocolate brown, and QUICKLY, while the paint is still wet, rinse out your brush, dry it, so it's damp but not holding any water, and brush back and forth along where the orange brown meets the chocolate brown. This is called wet blending and will create a nice smooth gradient between the two colors.

Once you've completed the wetblending process, finish painting the rest of the hooves, mouth and nose, mane, and tail with your chocolate brown.

Now that the horse is basecoated, we'll move onto the Great Khal himself. Get your medium flesh and paint the Khal's skin. Just like the orange brown on the skin, you'll probably want to apply at least two coats of paint, just make sure that you let the first coat dry before you apply the second.

So, in general, the name of the game with Drogo is going to be using multiple tones of brown to keep the whole thing from looking like just a big brown blob. We'll be using our hull red to paint the pants/shoes along with the bracers on his forearms. We'll also be painting the portion of leather on the face of the horse this color as well.

After that, you'll use your dark sand to paint Drogo's skirt/kilt and his "Saddle" which is really just a ratty blanket or piece of leather.

Now, take your flat earth and paint the tall grass beneath the horse's hoof, along with all the straps on Drogo's body, legs, and arms. This includes the ones that wrap around the outside of his pants that we already painted.

Here you can get a better view of the wraps around his legs. You don't HAVE to paint them a separate color, but doing so helps break up all the brown.

After that, take your german grey and paint Drogo's hair, beard(s), and all the rigging on the horse. If you don't have access to german grey, you can easily substitute a 50/50 mix of black and white.
You can also take this time to paint the horse's eyes this color as well.

Once you've done that, take your gold, don't thin it, and paint all of the gold medallions that can be found on the model. There are two on each strap going over Drogo's shoulders, one in the center of his chest, one over his navel, a few on the horse's rigging, and a couple of rings strewn about here and there, including one in the horse's nose.
You can also paint the decorative bands on the horse's tail this color as well.

In addition, there are a few gold bands wrapping up Drogo's braid, along with a chain that runs along the length of it, and a decorative piece at the end. I painted all of this gold, and for the chain, I turned my brush to the side and gently brushed it along the chain in the braid, allowing the sculpt to catch the paint from the brush.

After that, I took time to use my white to get the fur back up to a nice brightness. I also painted the handle of Drogo's sword this color, because I liked the idea of him with an ivory handle, but that's just me.

Then you'll take your gunmetal grey and paint the blade of his sword. Nothing too fancy, but don't thin your paint, just apply it directly, just like the gold.

Now it's time for everyone's favorite part, the severed heads! Take your fog grey and you light flesh and mix them together in a one to one mix, along with equal parts water, and paint each of the severed heads. This gives us a nice grey/blue look, but with a hint of flesh coloring.

After that, paint the hair and beards of the severed heads however you like (I chose colors that were readily available) and once that's all dry, it's time for shades!
3. Shades

Here's what we're using today: Flesh Wash, Red Tone, Soft Tone, and Dark Tone, all by The Army Painter.
We're going to start on the horse.

Apply the red tone all over the horse, to both the orange sections and the brown sections. Even the mane and the tail.
The horse is large, though, so I recommend you going section by section. Start with the head, then move the right front quarter, then the left front quarter and so on. This will help you applying the shade unevenly or smudging the wash that's already starting to dry.

After that you'll apply the flesh wash to Drogo's skin AND each of the severed heads. Nothing too fancy here, but don't let it go on too thick.

Here you can see how it adds JUST a hint of fleshy coloration to the heads.

After that, apply some soft tone to the dark tan portions, in this case the skirt, "Saddle", along with all fur and the gold. Just a thin coat of wash will help add depth.

The last wash you'll be applying will be the dark tone, and you'll apply that to the sword blade, all of the straps on the horse, all of the straps on Drogo, along with his pants and bracers.
You can also apply this to his hair if you want it to get really dark.
Once that's all dry, it's time for highlights!
4. Highlights and Finishing Touches

So, we're going to be starting off by highlighting the horse using our orange red. Just paint all of the horse's musculature, while leaving the recesses still darkened. You can also highlight the horse's face, around his eyes, with this color, as there are a lot of small muscles along with his eyelid that will make him pop.

After that, mix some chocolate brown into your orange red, in a one to one ratio, and highlight the lower portions of the horse's legs, along with his mouth and lips.
You can also use this color to highlight the mane and tail by picking out specific locks of hair and highlighting those.
If you have trouble figuring out where exactly to put the highlights, take a look at my Stark Outrider tutorial for an idea of where highlights occur on a horse's musculature.

Next we'll move onto highlighting Drogo's skin with medium flesh. Again, just like the horse, you'll paint where each muscle bulges out, leaving the recesses darkened.
You'll also paint the forehead, cheekbones, nose, and fingers and knuckles. You should also paint a THIN highlight on the top of his head running along each side of his mohawk.

Since he's got so much skin exposed, we're going to take some extra time with it and mix in some basic skin tone to our medium flesh and add a second level of highlights to Drogo. The idea is that you apply the second level of highlighting over the highlighting you've already done, but only in the center, and only covering up about half of what you've already painted.

Onto the severed heads! Mix in another drop of light flesh into your previous mix of fog grey and light flesh, and highlight each head's forehead, nose, cheekbones, and when you can, chin. You'll also want to highlight their severed necks as well.

After that you'll take your dark sand and highlight the top of Drogo's thigh, along with the portion of the kilt sticking out behind the Great Khal, painting each fold in the fabric.
For the "Saddle" you'll simply paint an edge highlight along the outside of the entirety of it.

Now mix some dark sand with some hull red and highlight the pants/boots of Drogo. As you can see in the picture above, just highlighting where the fabric bunches up and bulges outward.
You can also use this color to paint an edge highlight on both of Drogo's bracers and the leather armor on the horse's face.

After that, mix up some flat earth and dark sand in a one to one ratio, and highlight all the straps on Drogo, by painting a thin line along the top of them.

Take your necron compound and give the blade of the sword a little drybrush just to make it pop.
This is also the time you'd take your white and highlight up specific tufts of fur and the handle of the sword (if you wanted an ivory one like me).

Now, this next part is TOTALLY optional, but I used my field blue to duplicate the look of the warpaint he puts on his shoulders. Just two little lines on the shoulder that crawl down to his chest on each side is enough help the eye make the connection.
Normally, I'd say were done already, however, we need to bust some of this out:


After you've already sprayed the model with your matt spray, take your Tamiya clear red and paint the bottoms of the severed necks, along with some drizzling down their mouths and/or noses.
We do this after we've already sprayed them with matt spray because Tamiya clear red dries with a high gloss and we want that look for the bloody heads.
NOTE: Less is always more with gore and blood effects. RESIST the temptation to bathe them in gore. You won't be happy with the results.
5. Lead the Khalasar!

That's it, guys. Base him however you like and get him on the battlefield. Hopefully you found this helpful. Remember that this, along with all of my A Song of Ice & Fire tutorials can be found on my blog for future reference.
If you found this helpful, or really, if you found any of my tutorials helpful, I humbly ask you to consider becoming Patron. Every dollar counts and truly does go towards providing you with the best content possible.
Well, until next time, Westerosi!
Comments
Post a Comment