Become a Patron!


It's a nice DARK BROWN wash which gives everything a bit of a dirty look, which helps with what we're going for.


That's it! Now Jaime Lannister can sow misery and deceit with whichever opposing unit you choose to saddle with him.
 |
| by CMON Games |
"Was That All I Was...? A Sword Hand...?"
I've long said that Jaime Lannister was a fantastic character. I mentioned the character's ability to juxtapose both hatred and adoration from the audience/readers in my tutorial about the Kingslayer version of the character. But I think the biggest, and potentially best thing (in a manner of speaking) to happen to him was this:
This moment transformed him from being a roguish badass into a character with real angst and gave him an opportunity to both mature and become more of a HUMAN. The stories of maimed Jaime are hands down (see what I did there) superior to that of Kingslayer Jaime, so I think it's really great that CMON has given us BOTH versions of Jaime Lannister to include in our armies.

This particular annoyance is a timed Kickstarter exclusive, so if managed to pick up the Hand of the King Pledges, you should have a handless Jaime available to you. For everyone else, you'll just have to be patient.
 |
| Well, that sure got out of hand... |
This moment transformed him from being a roguish badass into a character with real angst and gave him an opportunity to both mature and become more of a HUMAN. The stories of maimed Jaime are hands down (see what I did there) superior to that of Kingslayer Jaime, so I think it's really great that CMON has given us BOTH versions of Jaime Lannister to include in our armies.

This particular annoyance is a timed Kickstarter exclusive, so if managed to pick up the Hand of the King Pledges, you should have a handless Jaime available to you. For everyone else, you'll just have to be patient.
1. Gameplan, Prep, and Prime
Okay, so anyone that has read my Kingslayer tutorial knows that when I think of Jaime Lannister, I only really think of Nicolaj Coster-Waldeau. So instead of going purely off of the in-game art, which is top notch, I'm going to be mostly basing my paint scheme off of this look:

Just imagine him with one less hand...
As you can see, this is going to be a pretty simple paint job (mostly black and brown), so we're going to try to make it really pop during the highlights and finishing touches step.
So, because of that, I've assembled these paints:

We've got Plate Mail Metal by The Army Painter and Dark Sand, Chocolate Brown, Flat Earth, and Basic Skin Tone by Vallejo. In addition to this, I've also got our classic black and white from the craft store for our 50/50 black/white mix.
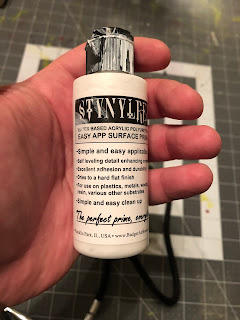
Those of you who are returning fans also probably remember that I typically only prime with Matt White spray on primer by The Army Painter, but my brother in law got me an airbrush for Christmas, along with a 3 pack of Stynylrez airbrush primer by Badger so I actually used that instead, as it has been raining cats and dogs over the Meeple household.

I have to say, though... I like it. I might like it even more than The Army Painter stuff...

It goes on smooth and thin, and has a pretty decent tooth, but not as much COLOR coverage as The Army Painter stuff, but I'd recommend it. We'll see how well rubber meets the road when I use the black primer for my Night's Watch stuff, though...
Anyway, ON TO BASECOATS!
2. Basecoats
Quick reminder to thin all of your basecoat paints with equal parts water!

We're actually going to start off by mixing our 50/50 black/white mix and painting up the cloak. Make sure you get a nice even coverage, but you shouldn't have to do more than one coat.

Don't forget the front mantle of the cloak. You'll also want to paint his pants this color as well.

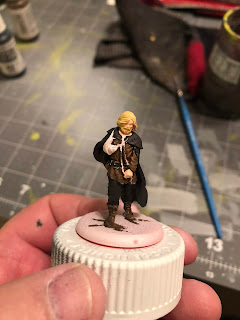
Now, using your chocolate brown, paint Jaime's shirt, shoes, and the little pouch on his right hip. I want this be a REALLY dark brown, so I'm going to make sure that I give this a second coat once the first is dry since I primed this figure in white.

After that, you'll paint the face and left hand with your basic skin tone. Don't forget to get his lip showing through his beard, and don't worry about getting this color on the beard itself, it's pretty easy to cover up in the next step.

Okay, so if you've read my Kingslayer tutorial, you'll remember that I gave Jaime and his brother and sister BRIGHT yellow hair. Well, since this is a more somber version of Jaime, a dirtier version of Jaime, I went with a tan for the base.
Use your dark sand and paint his hair and beard. Be careful around this lips and mustache. The better your detail work on his face, the better a more plain paint job will look.
You can also take this time to paint his belt with your 50/50 black/white mix.

Now using your plate mail metal, you'll paint the chain and shackle around his neck along with his belt buckle and clip on his belt.

Remember how I said that the Badger primer didn't have as strong a color to it as the Army Painter one? Well here's where that matters.
Paint his bandages and sling white. For this I did end up using some Matt White by the Army Painter, but any white should do. Don't forget to get the portion of the sling that wraps around the back of his neck.

The last thing we'll basecoat will be the stitches in Jaime's clothing. Using your dark sand again, along with your smallest brush, just barely paint the small stitches that look like they're holding the cloak together.

There is also some stitching on the side of his right pant leg, and you can even paint the draw string of his pouch this color as well to break up the dark brown of the shirt.
Once that's dry, it's time for shading!
3. Shading

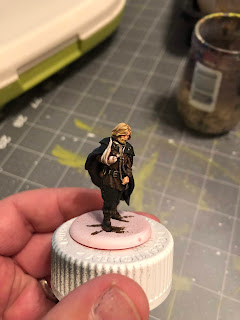
We are just going to be using two today: Flesh Wash and Strong Tone by the Army Painter.
We'll be starting off with the flesh wash.

Just a single drop should be more than enough to cover the face and hand. Don't forget the lip as well, and if some gets on the hair, it's not a big deal as the strong tone will really overpower it.

Strong tone will go over everything else. The hair, the clothes, the bandages, the shackles. All of it.
It's a nice DARK BROWN wash which gives everything a bit of a dirty look, which helps with what we're going for.
Once that's all dry, it's time for highlights!
4. Highlights and Finishing Touches
Like I typically do, we're going to start off by highlighting the skin.

Using your basic skin tone, highlight the forehead, the nose, the cheeks, and the lip on the face. For the hand, get the knuckles and the index finger all the way through the thumb. The rest of the fingers you can leave darkened to simulate depth.

After that, use your dark sand to highlight the hair and stitching. For the hair, apply the highlights while looking at the figure top-down. Mainly just focus on highlight the portions near the part in the hair and the bangs that billow in the front like Farrah Fawcett.
You also want to highlight the mustache and beard at this time. For the beard, just add some small dabs every few millimeters or so. This broken up look adds to selling that his beard is filthy.

Next, get your white and highlight the bandages and sling. Try to stay within the lines for each individual bandage. You don't want to cover the depth that shows each individual bandage pieced together to hold Jaime's wrist together.
As for the sling, you can see, I actually only highlight until about three quarters of the way down his arm. This keeps the underside of his sling nice and dark and dirty looking.

For the tunic and shirt, we're actually doing to mix together the flat earth and chocolate brown in a 2/1 mix and highlight all the folds in the shirt. The mix with the lighter flat earth color helps give the figure a little pop.
You can also highlight the shoes with this color as well, but a lot of that we will be covering up later.

Now we're going to add just a tiny bit more white to our black/white mix and we're just going to apply some top-down highlights to the cloak and shoulders, focusing on where the cloak billows outward.

You can also use this new and improved, slightly lighter black/white mix and highlight just the thighs of Jaime, stopping at the knee, while trying to also highlight where the pants bunch up around his hip.
Now, normally, after that part, we'd be finished, and I'd say base him and all that, however, because handless Jaime is a prisoner, we're going to take it up a few by using some Vallejo Dark Earth.

Those of you who read my tutorial on the Stark Outriders know that this is what I use to base my minis, but we're going to use it on Jaime himself to really sell the look that he's been rolling around in his own filth.

We're going to be applying a very thin layer of this to the top of the shoes, knees, and the fringe of the skirt of Jaime's shirt.

Also apply a decent amount to the back tail of the cloak. This will give the look that the cloak has been dragging through the mud and muck.

If you're REALLY feeling daring, you can even at just a TINY TRACE amount to the bottom of the hair and beard, along with his left hand. You don't want to add TOO MUCH, because you don't want him to look like mud man or drown your details. Besides, just a little bit will be more effective in selling the illusion than a TON of the stuff.
You're done, right? Well, not quite!
After the Vallejo Dark Earth has dried (it can take quite a while), spray that sucker with your matt spray, but then you'll want to bust out some Tamiya Clear Red.

We add this AFTER you've already sprayed with matt spray because if you add it before, the matt spray will just dull the glossy finish of the clear red, and the glossy finish is what we're looking for.

Always remember, like I said in my Finishing Touches Tutorial, less is more with blood and guts. All we really need is a few little dabs over the bandaged part of the wrist to give the illusion of a bleeding wound that is POORLY dressed.
5. Stab Some Soldiers in the Back!

That's it! Now Jaime Lannister can sow misery and deceit with whichever opposing unit you choose to saddle with him.
Like always this tutorial, along with all my other A Song of Ice & Fire Painting tutorials can be found here. If you've found this or any of my other tutorials or articles useful or helpful, please consider becoming a Patron. Every dollar helps bring us closer to the dream of an ad-free blog delivering quality content on a weekly basis!
Thanks for taking the time to read and remember, just pick up that paintbrush and start painting. It's all about whether or not you're happy with the results and if you had fun doing it. If somebody else doesn't like it, or thinks it doesn't look that great, SCREW 'EM.
Comments
Post a Comment